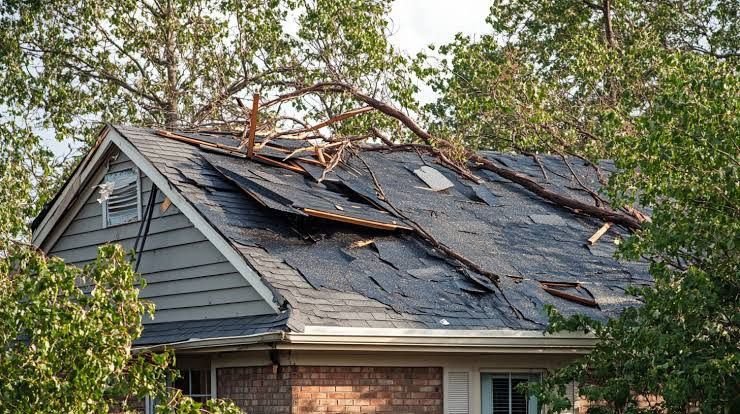
After a major storm, the difference between a covered insurance claim and a denied one often comes down to what you do in the first 48 hours, points out Midwest City property management. This storm damage roof repair checklist walks you through the exact steps — from the moment the storm passes to the moment the contractor finishes the repair — in the order that protects your safety, preserves your insurance claim, and minimizes the total cost.
Most homeowners make two mistakes after a storm. They either wait too long to document the damage, or they start repairs before the insurance adjuster arrives. Both mistakes cost money. The adjuster needs to see the damage as it was when the storm caused it. A repaired roof looks like a roof that was never damaged. A tarp over a hole is evidence. A new shingle over a hole is not.
Step 1: Immediate Actions — the First Hour After the Storm
Check for safety hazards first. Downed power lines, large tree limbs resting on the roof, and structural sagging are emergencies. Call the utility company for downed lines. Call a contractor for structural concerns. Do not climb onto a roof that may be structurally compromised.
Document from the ground. Take photos and video of the entire exterior — every roof slope, every gutter, every window, every piece of siding. Photograph any debris on the ground — shingle fragments, tree branches, hail dents in cars or outdoor furniture. These ground-level photos establish that a storm event occurred and correlate with the roof damage you will document later. Do this immediately, before rain washes away debris or wind scatters it.
Check the attic. Go into the attic with a flashlight. Look for water stains on the underside of the roof deck, wet insulation, and daylight visible through the roof boards. Mark any wet or stained areas with tape or chalk so you can show the adjuster exactly where the water entered. Photograph everything. A wet attic on the day after a storm is evidence of storm-caused damage. A wet attic discovered two weeks later could be storm damage or could be a pre-existing leak.
Check the interior. Walk through every room on the top floor. Look for water stains on ceilings and walls. Photograph every stain, even small ones. A small stain from storm-driven water may dry and become nearly invisible within days. The photo is the permanent record.
Step 2: Emergency Tarping, Stop the Water Now
If the roof is breached, a hole, missing shingles exposing the underlayment, or visible water entry, tarp it immediately. A heavy-duty tarp costs $12 to $30. Anchor it with 2x4s screwed through the tarp into the roof deck, not with bricks or loose boards that wind will dislodge. The tarp should extend past the damaged area by at least 3 feet on all sides and be secured at the edges to prevent wind from lifting it.
If the roof is too steep, too high, or too dangerous to access, call a contractor for emergency tarping. Expect to pay $200 to $500 for an emergency tarp service call. The cost is frustrating. The alternative, water pouring into the house for 48 hours while you wait for the insurance adjuster, is far more expensive. A tarped roof is a roof that stops getting worse. An untarped roof is a roof that adds to the damage total every time it rains.
Do not make permanent repairs yet. Tarping is a temporary measure to prevent further damage. It is not a repair. The insurance adjuster needs to see the damage as the storm left it. A tarp is removable. A new shingle is not. Wait for the adjuster before authorizing permanent repairs.
Step 3: Filing the Insurance Claim, Documentation First, Phone Call Second
Gather your documentation before you call the insurance company. You will need: photos of all exterior damage from multiple angles, photos of interior water stains, photos of debris on the ground, the date and time the storm occurred, and a written list of every area of the house that shows damage. The more organized your documentation, the smoother the claims process. Adjusters work from evidence, not from descriptions.
Call your insurance company to file the claim. Provide the date of loss, a summary of the damage, and your documentation. Ask the adjuster: “What is my deductible for wind and hail damage?” Many policies have a separate wind and hail deductible, typically 1% to 2% of the home’s insured value. On a $400,000 house, that is $4,000 to $8,000. If the repair estimate is lower than the deductible, filing a claim is counterproductive, the claim counts against your claims history, and you will not receive any payment because the damage does not exceed the deductible.
The National Roofing Contractors Association (NRCA) recommends that homeowners obtain at least two independent roof damage assessments after a major storm, one from the insurance adjuster and one from a licensed roofing contractor of the homeowner’s choosing. The adjuster works for the insurance company. The contractor works for you. Their assessments may differ. The difference between them is the basis for negotiation.
Step 4: Contractor Selection, Who to Call and Who to Avoid
Avoid storm chasers. After a major storm, out-of-town contractors descend on affected neighborhoods offering free inspections and quick repairs. Some are legitimate. Many are not. A storm chaser who collects a deposit and disappears leaves you with no roof, no money, and no recourse because their business is registered in another state. Hire a local contractor with a physical address in your area, a state contractor’s license you can verify online, and references from jobs completed before the storm. A contractor who was working in your area last month has a reputation to protect. A contractor who arrived yesterday does not.
Verify insurance and license. Ask for certificates of liability insurance and workers’ compensation, current and in the contractor’s name. Verify the license status online with your state’s licensing board, most states have a lookup tool that takes 30 seconds. If the contractor hesitates for even a moment, end the conversation. An uninsured roofer who falls off your roof becomes your liability. An unlicensed roofer who performs substandard work has no licensing board to answer to.
Get at least two written estimates from licensed, local contractors. The estimates should use the same scope of work so you can compare them line by line. Do not share one contractor’s estimate with another. If the estimates are within 10% to 15% of each other, the price is market-rate. If one estimate is 40% lower, the low bidder is either missing something or planning to find it once the work begins.
Step 5: The Adjuster Meeting, Be Present and Prepared
Be present when the adjuster inspects the roof. Walk them through your documentation, the photos, the marked attic areas, the interior stains. Point out every area of concern. The adjuster may not climb onto the roof if it is too steep or too high, relying instead on a ground-level assessment or drone footage. Your ground-level photos and attic documentation become more important in that scenario.
Have your contractor present at the adjuster meeting if possible. The contractor can point out damage that a non-roofer might miss, granule loss from hail impact, lifted shingle tabs from wind uplift, subtle flashing separation. The contractor speaks the adjuster’s language. The homeowner does not. The contractor’s presence often results in a more accurate damage assessment and a higher claim payment, not because the contractor inflates the damage, but because they identify damage the adjuster might overlook.
Step 6: The Repair, What to Expect and What to Watch For
Review the scope of work against the adjuster’s report. The contractor’s estimate and the insurance adjuster’s scope of work should align on the major items, number of squares to replace, flashing replacement, gutter repair, interior damage remediation. If they do not align, resolve the discrepancy before work begins. The insurance company will pay based on the adjuster’s report, not the contractor’s estimate. If the contractor’s scope is larger, negotiate the difference with the adjuster or be prepared to pay the difference out of pocket.
Confirm that the contractor is installing materials that match the existing roof. Storm repairs on one slope must match the undamaged slopes in shingle type, color, and profile. If the existing shingles are discontinued, common on roofs older than 10 years, the insurance policy may cover replacement of the entire roof to achieve a reasonable color match. Ask the adjuster about matching coverage. Many policies include a “matching endorsement” or a “line of sight” provision that requires the insurer to pay for replacement of undamaged sections if a color match cannot be achieved on the damaged section.
Do not sign a certificate of completion or release the final payment until you have inspected the repair. Walk the ground-level perimeter. Check the attic for any signs of continued water entry. Verify that the gutters are clear of construction debris. Confirm that the permit has been signed off by the building inspector. The final payment is your only bargaining power. Do not release it until the job is complete, inspected, and documented.
Frequently Asked Questions
What should I do immediately after storm damage to my roof?
Check for safety hazards first, downed power lines, structural sagging. Document all damage from the ground with photos and video. Check the attic for water entry. If the roof is breached, tarp it immediately to prevent further water damage. Do not make permanent repairs before the insurance adjuster inspects the damage. Call your insurance company to file the claim within 24 to 48 hours.
Should I file an insurance claim for storm damage?
File a claim if the estimated repair cost exceeds your wind and hail deductible. Most policies have a separate deductible of 1% to 2% of the home’s insured value. If the repair costs less than the deductible, pay for the repair out of pocket, filing a claim that pays nothing still counts against your claims history and can increase future premiums.
Can a roofing contractor help with my insurance claim?
Yes. A reputable contractor can meet with the insurance adjuster, point out damage the adjuster might miss, and provide a competing damage assessment. The contractor does not negotiate with the insurance company on your behalf, that is called public adjusting and requires a separate license in most states. The contractor provides evidence. You or a licensed public adjuster negotiate the claim.
How long do I have to file a storm damage insurance claim?
Most homeowners insurance policies require claims to be filed within one year of the date of loss. Some states mandate shorter windows for wind and hail claims, as little as six months. Check your policy or contact your agent. File the claim as soon as possible after documenting the damage. The longer you wait, the harder it is to prove the damage was caused by the storm rather than by gradual deterioration.
What if my insurance company denies my storm damage claim?
Ask for the denial in writing with the specific reasons. Get a second opinion from an independent roofing contractor. If the contractor’s assessment differs significantly from the adjuster’s, request a re-inspection with the contractor present. If the re-inspection is also denied, consider hiring a licensed public adjuster who works on contingency, typically 10% to 15% of the final claim payment. A public adjuster represents you, not the insurance company.
How do I tell the difference between storm damage and normal roof wear?
Storm damage is typically concentrated and random, hail hits in a pattern across one or two slopes, wind lifts shingles along a specific edge or corner. Normal wear is distributed and gradual, uniform granule loss, consistent curling at shingle edges, even fading across the roof. A roofing contractor can distinguish between the two. The insurance adjuster will make the final determination. The photos you took immediately after the storm are your best evidence.
The Checklist, Condensed
- Check for hazards. Document everything from the ground with photos.
- Check the attic and interior for water. Mark and photograph all damage.
- Tarp any breaches. Do not make permanent repairs yet.
- Call insurance. Confirm your wind and hail deductible. File the claim.
- Hire a local, licensed, insured contractor. Avoid storm chasers.
- Be present at the adjuster meeting. Bring your contractor.
- Align the scope of work. Confirm matching coverage if shingles are discontinued.
- Inspect the completed repair. Do not release payment until satisfied.
The 48 hours after a storm determine whether the repair is a covered insurance claim or an out-of-pocket expense. The roof is damaged regardless. The documentation, the tarp, the adjuster meeting, and the contractor selection decide who pays for it. Do the steps in order. Do not skip the documentation. Do not start permanent repairs before the adjuster arrives. The roof can wait 48 hours under a tarp. The insurance claim cannot wait 48 hours to be filed. The clock is running. Ever heard a contractor say “I can start next week” during the busiest roofing season of the year? That timeline assumes you called them today. Call tomorrow and next week becomes the week after. The early caller gets the schedule. Everyone else gets the waiting list.