Painting baseboards over carpet is a geometry problem. The carpet fibers touch the trim. Paint applied to the bottom edge of the trim wicks into the carpet fibers by capillary action. Painter’s tape laid flat on the carpet does not seal against the trim because the carpet pile pushes the tape up and away from the joint. The paint seeps under the tape and into the carpet. A dried paint stain in wall-to-wall carpet is permanent.
The solution is to create a gap between the carpet and the trim so paint does not touch the carpet. Here are three methods ranked from best to acceptable, and the one method that does not work.
Method One: Tape and Tuck With a Putty Knife
This is the method professional painters use. It takes more time than simply laying tape on the carpet, but the tape actually works.
Vacuum along the baseboards thoroughly. Carpet holds dust, hair, and debris that prevent tape from adhering. Run a length of painter’s tape along the carpet approximately 1/4 inch away from the baseboard. Press the edge of the tape closest to the trim down firmly with your finger. Leave the far edge of the tape loose.
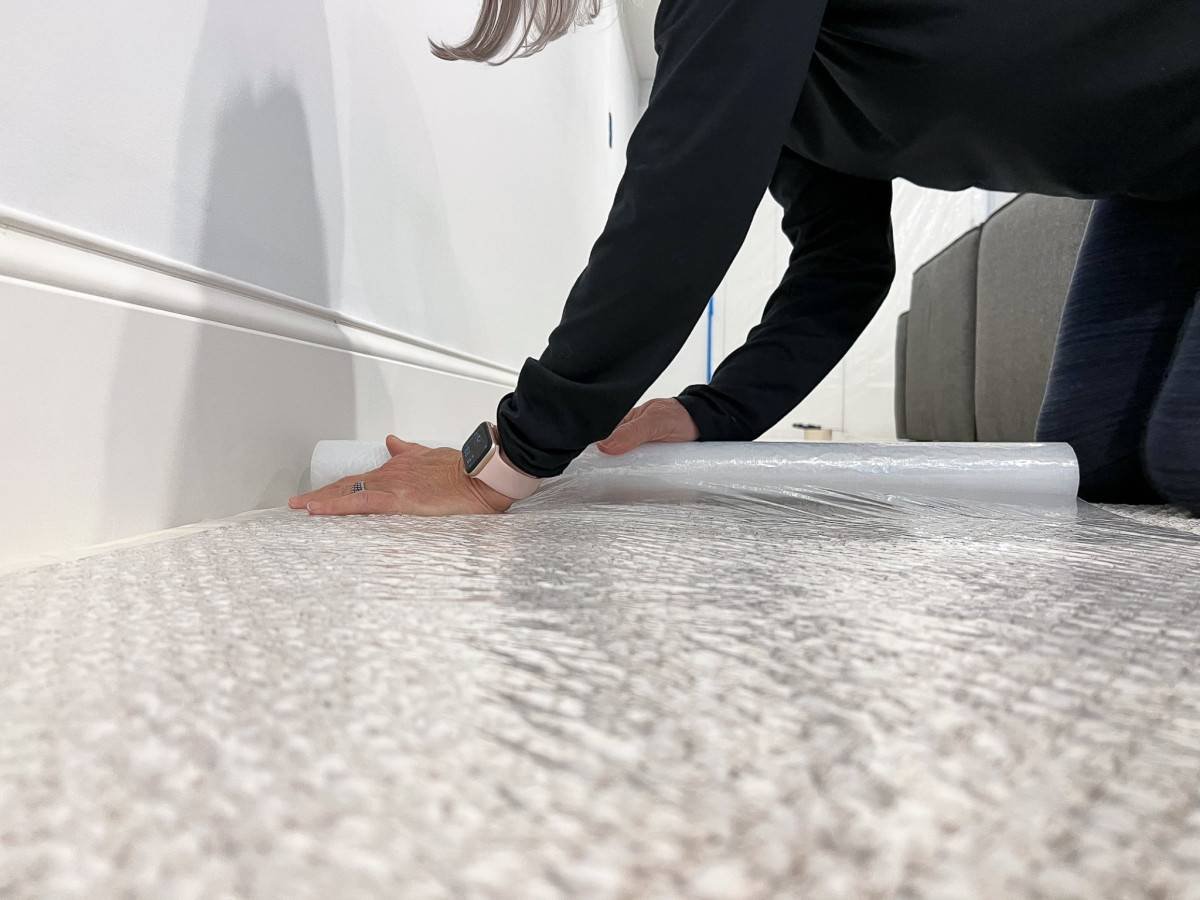
Slide a 4-inch or 6-inch putty knife or a stiff paint shield between the carpet and the baseboard. Press down firmly to compress the carpet pile. The putty knife creates a gap. With the putty knife holding the carpet down, use your other hand to press the tape down against the carpet, working the edge of the tape underneath the baseboard as far as it will go. Slide the putty knife along as you work. The tape should be tucked under the baseboard, with the carpet compressed under the putty knife and the tape wedged into the gap.
When you remove the putty knife, the carpet springs back up and traps the tape against the bottom of the baseboard. The tape is now sealed along the bottom edge of the trim. Paint applied to the baseboard will hit the tape, not the carpet. Remove the tape within a few hours of painting, before the paint dries completely. Dry paint forms a film that bridges from the trim to the tape. Pulling the tape tears the film and leaves a ragged edge. Pull the tape at a 45-degree angle away from the trim while the paint is still slightly tacky.
Method Two: Paint Shield With a Steady Hand
A paint shield is a thin metal or plastic rectangle, typically 12 to 18 inches long and 4 to 6 inches wide, that you slide between the carpet and the baseboard. The shield pushes the carpet down and away from the trim. You paint the bottom edge of the baseboard above the shield. The paint drips onto the shield, not the carpet. Wipe the shield clean after each section, reposition, and continue.
Paint shields cost $5 to $10 at any paint or hardware store. A wide putty knife, 6 inches or wider, works as a paint shield in a pinch. The shield method is faster than taping because there is no tape to apply or remove. The trade-off is that a paint shield requires a steady hand. The shield protects the carpet directly underneath the area you are painting. It does not protect the carpet a few inches to either side where an errant brush stroke or a drip from the brush can land. Tape protects a wider area. A shield protects directly underneath.
Method Three: Remove the Baseboards
Removing the baseboards before painting is the cleanest method and produces the best result. The baseboards are painted flat on sawhorses in a garage or a drop-clothed room. There is no carpet to protect. There is no cutting in at the floor. The paint job is cleaner, faster, and free of the anxiety of dripping on carpet.
Score the caulk line between the baseboard and the wall with a utility knife. This breaks the paint and caulk bond that would otherwise tear the drywall paper when the baseboard is pried off. Slide a thin pry bar between the baseboard and the wall. Pry gently at each stud location. Work your way along the length of the board, loosening it gradually rather than prying from one end. Remove the nails from the back of the baseboard with pliers. Pull the nails through the back of the board rather than hammering them back out the front, which splinters the finished face.
Number each board on the back and mark the corresponding number on the wall with a small pencil mark hidden behind where the board will go. The boards go back to their original locations. Walls and baseboards are never perfectly straight. A board reinstalled in a different location will not fit the same.
Paint the boards flat. Reinstall them with a finish nailer. Fill the nail holes with spackle or painter’s putty. Touch up the nail holes with paint. Caulk the top edge where the baseboard meets the wall. Do not caulk the bottom edge where the baseboard meets the carpet. The bottom edge is hidden. Caulk there serves no purpose.
What Does Not Work: Tape Alone on Carpet
Applying painter’s tape directly to the carpet and pressing it against the baseboard with a finger does not create a seal. The carpet pile holds the tape away from the baseboard. Paint seeps under the tape and into the carpet. The paint stain is hidden until the tape is removed. By then, the paint has dried in the carpet fibers and is permanent.
This method fails so reliably that it is not a method. It is the thing everyone tries first, and it is the reason people search for how to paint trim on carpet. Do not tape directly to carpet without tucking. It does not work.
What to Do If Paint Gets on the Carpet
Water-based latex paint on carpet can be removed if you act immediately. Wet a clean cloth with warm water. Blot the paint. Do not rub. Rubbing pushes the paint deeper into the carpet fibers and spreads it. Blot, rinse the cloth, blot again. Repeat until the paint is gone. A small amount of dish soap on the cloth helps break up the paint.
Oil-based paint on carpet is a problem for which there is no DIY solution that reliably works. Mineral spirits may dissolve the paint but can also dissolve the carpet adhesive backing. Test on an inconspicuous area of carpet, such as inside a closet, before applying any solvent. If the test damages the carpet, accept the stain or call a professional carpet cleaner. The cost of a professional cleaning is less than the cost of replacing a section of wall-to-wall carpet.
Dried paint in carpet is permanent for practical purposes. Scraping or cutting the paint off the carpet fibers removes the fibers along with the paint. You can carefully trim individual carpet tufts with small scissors to remove paint specks, but this only works for small drips. A continuous line of dried paint along the baseboard is a permanent stain.
Frequently Asked Questions
Should I use a drop cloth in addition to tape?
Yes. Tape along the baseboard protects the carpet directly at the trim line. A drop cloth protects the carpet in the work area from drips, spills, and the paint tray. Tape and a drop cloth serve different functions. Tape protects the edge. Drop cloth protects the field. Canvas drop cloths stay in place on carpet better than plastic sheeting, which slides and bunches underfoot. A canvas drop cloth costs $15 to $30 and is reusable for every painting project.
How do I paint baseboards faster without making a mess?
Use a 2-1/2-inch angled sash brush and a mini roller. The brush cuts in along the top edge of the baseboard where it meets the wall. The 4-inch mini roller covers the flat face of the baseboard in seconds. The roller applies paint faster than a brush and leaves a smoother finish with no brush marks. Roll as close to the carpet as you safely can, then finish the last half inch with the brush and a paint shield. This combination is the fastest method that produces a clean result.
I have shoe molding or quarter-round at the base of my trim. How does that change things?
Shoe molding makes the job easier. Remove the shoe molding before painting the baseboard. Shoe molding is thin and flexible and pries off easily with a flat pry bar. Paint the baseboard with the shoe molding removed. There is no longer a carpet-to-trim joint to protect. Paint the shoe molding separately on sawhorses. Reinstall the shoe molding after the baseboard and the shoe molding are dry. Nail the shoe molding to the baseboard, not to the floor. The shoe molding covers the gap between the baseboard and the carpet and hides any imperfections in the paint line at the bottom of the baseboard.