Lifeproof vinyl plank flooring is a rigid-core click-lock floating floor sold exclusively at Home Depot. It installs like laminate but is waterproof, more flexible, and does not require a separate underlayment because the underlayment is attached to the back of each plank. It can be installed in bathrooms, kitchens, laundry rooms, and basements where laminate cannot go. The installation is faster than laminate because there is no underlayment to roll out, and the planks are lighter and easier to cut.
A 150-square-foot room takes 4 to 6 hours for one person. The process is the same as any click-lock floating floor, with a few Lifeproof-specific requirements that affect the warranty. Here is what to do and what to avoid.
What Makes Lifeproof Different From Other Vinyl Plank
Lifeproof uses an ISOCORE rigid core, which is a limestone and PVC composite that is denser and stiffer than standard vinyl plank. The core does not flex as much as flexible glue-down vinyl, which means the subfloor flatness requirement is stricter. The attached underlayment is a thin foam layer bonded to the back of each plank. There is no separate underlayment to buy or roll out. The underlayment provides sound absorption and minor subfloor smoothing. It is not a vapor barrier over concrete. A separate 6-mil polyethylene vapor barrier is required over concrete, just as with any floating floor.
Lifeproof is waterproof, not water-resistant. Spills and pet accidents that sit on the surface will not damage the plank. Water that seeps through the seams and pools on the subfloor will not damage the plank but can damage the subfloor. The floor is waterproof. The subfloor underneath is not. Clean up standing water promptly.
Step One: Acclimate the Flooring
Lifeproof requires a 48-hour acclimation period in the room where it will be installed. The boxes must be laid flat, not on edge. The room temperature must be between 50 and 100 degrees Fahrenheit during acclimation and installation. Lifeproof’s acclimation requirement is shorter than some laminate brands and is effective across a wider temperature range because vinyl is more dimensionally stable than laminate. Do not skip acclimation. Planks that are not acclimated expand or contract after installation and buckle at the seams.
Step Two: Prepare the Subfloor
The subfloor must be flat to within 3/16 inch over a 10-foot span. Check this with a straightedge or a long level. The rigid ISOCORE core telegraphs subfloor irregularities more than flexible vinyl. Low spots must be filled with a cement-based floor patch. High spots must be sanded or ground down. The subfloor must be clean and dry. Sweep, vacuum, and wipe with a damp cloth.
Lifeproof can be installed over most existing hard surfaces: concrete, plywood, OSB, vinyl sheet flooring, ceramic tile, and laminate. It cannot be installed over carpet, carpet pad, or any floating floor that is not fully adhered to the subfloor. A floating laminate floor must be removed before Lifeproof is installed. Lifeproof cannot float over another floating floor. The two floating layers will shift independently and the click-lock joints will fail.
Over concrete, a 6-mil polyethylene vapor barrier is required. The Lifeproof attached underlayment does not replace the vapor barrier over concrete. Roll out the polyethylene, overlap the seams by 6 inches, tape them with waterproof tape, and run the plastic up the walls 2 inches.
Over existing vinyl sheet flooring that is well-adhered and not cushioned, Lifeproof can be installed directly on top. The existing vinyl must be clean and free of wax or polish that could prevent the new floor from laying flat. The existing vinyl must be a single layer. Multiple layers of old flooring create too much compression and movement.
Step Three: Plan the Layout
Run the planks parallel to the longest wall or parallel to the primary light source. Measure the room width perpendicular to the plank direction. The last row must be at least 2 inches wide. If the calculation produces a last row narrower than 2 inches, cut the first row narrower to balance the first and last rows. Mark the starting line with a chalk line. Do not trust the wall to be straight. Walls are rarely straight. The chalk line is straight.
Lifeproof planks are 7 inches wide and 48 inches long for standard residential planks. The long length makes the floor look more like hardwood and reduces the number of short-end joints compared to shorter vinyl planks.
Step Four: Install the Planks
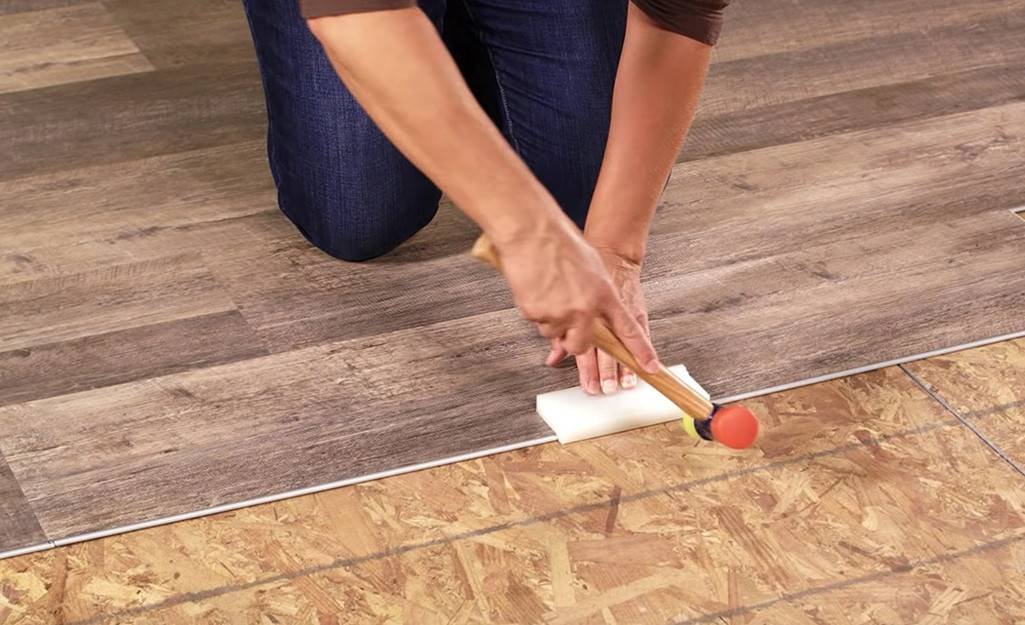
Lifeproof uses an angle-angle click-lock system. The short end of the new plank is angled into the short end of the installed plank at approximately 20 to 30 degrees. The plank is folded down flat. The long edge of the new plank is then angled into the long edge of the previous row. The entire row is folded down. The joints click into place. A tapping block and a pull bar are used to close any gaps at the ends of rows. Do not hit the plank directly with a hammer. The vinyl edge will deform or chip.
Lifeproof planks are more flexible than laminate, which makes the angle-angle installation easier but also means the planks can be damaged by aggressive tapping. Use a tapping block on the cut edge of the plank, not on the click-lock profile. The profile edges are precisely machined and will not lock correctly if they are deformed by hammer strikes.
Maintain a 1/4-inch expansion gap around the entire perimeter. Lifeproof requires a 1/4-inch gap at all walls, doorways, pipes, and transitions. The gap is hidden by baseboards or quarter-round molding. In rooms larger than 30 feet in any direction, Lifeproof requires an expansion joint, which is a gap covered by a T-molding, to allow the floor to expand and contract without buckling.
Stagger the end joints by at least 6 inches. Lifeproof’s minimum stagger is shorter than laminate’s 12-inch requirement because the planks are shorter and the joints are tighter. Use the cutoff piece from the end of one row to start the next row if it is at least 6 inches long. A random stagger looks more like hardwood than a repeating pattern.
Cut Lifeproof planks with a utility knife and a straightedge. Score the plank face deeply, snap it along the score line, and cut the attached underlayment on the back with the knife. A miter saw or a jigsaw also works and is faster for large jobs. Vinyl produces less dust than laminate when cut with a power saw. The fine vinyl dust is still irritating to lungs. Wear a dust mask.
Step Five: Transitions and Trim
Lifeproof sells matching transition strips at Home Depot. T-molding for same-height transitions, reducer strips for transitions to lower flooring, and end caps for transitions to exterior doors and sliding glass doors. The transition track is attached to the subfloor with screws or construction adhesive. The Lifeproof planks float underneath the transition. The gap between the planks and the track allows for expansion and contraction.
Reinstall baseboards or install quarter-round molding to cover the expansion gap. Nail the molding to the wall or to the baseboard, never to the floor. Nailing through the Lifeproof into the subfloor locks the floating floor in place and causes buckling.
At doorways, undercut the door casing and jamb so the Lifeproof slides underneath. Use an oscillating multi-tool with a scrap piece of Lifeproof as a height guide. The expansion gap is hidden under the casing.
Post-Installation: First Clean and Protection
Lifeproof can be walked on immediately after installation. Furniture can be placed after the floor has settled for 24 hours. Use felt pads under all furniture legs. Lift furniture to move it. Do not slide furniture across Lifeproof. The wear layer resists scratches but is not scratch-proof. Dragging a heavy piece of furniture across the floor can leave marks.
Clean Lifeproof with a damp mop and a pH-neutral cleaner. Do not use abrasive cleaners, steel wool, or scrub brushes, which dull the wear layer. Do not use a steam mop. The heat and moisture from a steam mop can damage the click-lock joints and the attached underlayment. The warranty excludes damage from steam mops.
Frequently Asked Questions
Can I install Lifeproof in a full bathroom with a shower?
Yes. Lifeproof is waterproof. The seams are tight enough to resist splashes and occasional standing water from stepping out of the shower. The expansion gap at the perimeter must be sealed with 100 percent silicone caulk in wet areas to prevent water from reaching the subfloor at the edges. The toilet flange and the bathtub or shower base must also be sealed with silicone. The floor is waterproof. The perimeter is the weak point.
Will Lifeproof fade in direct sunlight?
Yes, over years. Lifeproof has a UV-resistant wear layer, but no vinyl flooring is completely immune to fading from direct sunlight through windows. Close blinds or curtains during the brightest parts of the day in rooms with large south-facing or west-facing windows. Area rugs also protect the floor from UV exposure. Fading is a cosmetic issue, not a structural one. It is not covered under warranty.
Can I install Lifeproof on stairs?
Yes, with a stair nose molding from the same Lifeproof collection. The stair nose is a bullnose trim piece that covers the front edge of each stair tread. The Lifeproof plank is installed on the tread, and the stair nose overlaps the edge. The stair nose is glued and screwed into the subfloor. Lifeproof on stairs is a glue-down application, not a floating application. The adhesive specified by Lifeproof for stair installation must be used. The floating click-lock system is not sufficient to hold planks on stairs.