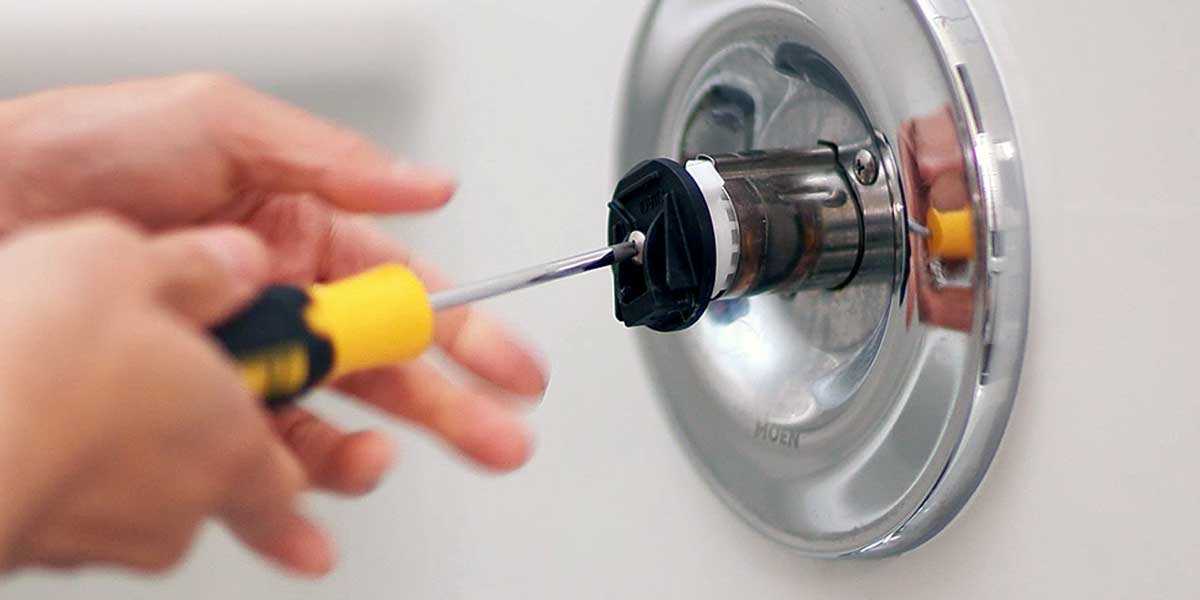
Fixing a leaky bathtub faucet means shutting off the water supply, removing the handle, and replacing the worn washer, O-ring, or cartridge causing the drip. Most repairs take 30 to 60 minutes with basic tools and a $5 to $15 replacement part from any hardware store. The tricky part is knowing exactly which type of faucet you have — because the steps are different for a two-handle compression faucet versus a single-handle cartridge, and different again if the leak is coming from the tub spout rather than the handles, explains louisebeckproperties.com.
That distinction matters more with bathtub faucets than with kitchen or bathroom sink faucets. Tub faucets are wall-mounted, often older, and frequently use a stem-and-washer design that hasn’t changed much since the 1970s. A faucet that drips once per second wastes more than 3,000 gallons of water per year, according to the U.S. Environmental Protection Agency. Getting the repair right the first time avoids a callback and keeps that water — and money — where it belongs.
Why Your Bathtub Faucet Is Leaking
A dripping bathtub faucet almost always traces back to one of four internal components: a worn seat washer, a degraded O-ring, a failing cartridge, or a corroded valve seat. Each one controls how water is sealed inside the faucet body when the handle is in the off position, and when any of them wear out, water finds a path through.
| Cause | Where the Drip Appears | Most Common Faucet Type |
|---|---|---|
| Worn seat washer | From the spout when water is off | Two-handle compression (stem) |
| Degraded O-ring | Around the handle base | Compression and cartridge |
| Failing cartridge | From the spout, especially when mixing temps | Single-handle cartridge |
| Corroded valve seat | Persistent drip despite washer replacement | Any compression faucet |
| Worn diverter valve | Tub spout drips even when shower is on | Tub/shower combo |
The U.S. Geological Survey’s drip calculator puts the math in perspective: one drip per minute adds up to 34 gallons wasted per year. At the rate many bathtub faucets drip — one drop every 5 seconds — that figure climbs past 100 gallons annually. Multiply by the typical water rate, and you’re paying about $1 to $2 extra per month for the privilege of ignoring it.
That slow drip tends to accelerate, too. The seat washer compresses thousands of times over its life; once it starts breaking down, each use speeds up the deterioration. A drip that sounds minor today can double in frequency within a few months.
Identifying Your Tub Faucet Type
The three most common bathtub faucet configurations are two-handle compression (the classic hot-and-cold knobs), single-handle cartridge (one lever controls both temperature and flow), and three-handle (separate hot, cold, and diverter handles found in older tub-shower combos). Identifying your type before buying parts or picking up a wrench saves a wasted trip to the hardware store.
| Faucet Type | Handle Count | How to Identify | Common Era |
|---|---|---|---|
| Two-handle compression (stem) | 2 (separate hot/cold) | Handles require noticeable turning force; rubber washer visible on stem | Pre-1980s, still common |
| Single-handle cartridge | 1 (lever or knob) | One handle controls both temp and flow; smooth operation | 1990s-present |
| Three-handle | 3 (hot, cold, diverter) | Middle handle diverts water from tub to showerhead | 1950s-1970s |
| Ball faucet | 1 (rotating ball mechanism) | Single lever rotates in a dome-shaped cap; more common in kitchen sinks | 1980s-present |
To confirm the type, turn off the water and remove one handle cover. A two-handle compression faucet will reveal a threaded brass or plastic stem with a rubber washer on the bottom. A cartridge faucet will expose a cylindrical plastic or brass cartridge that slides straight out.
A chrome two-handle faucet installed during a 1968 renovation and a wall-mounted single-lever installed last year look like they belong in different eras, and they do. But both fail for the same mechanical reason: repeated use wears down the sealing surface until water wins.
Tools and Materials Checklist
Gather these before turning off any water. Having the right parts on hand before disassembly means you won’t need to reassemble a broken faucet and make a mid-repair hardware store run.
- Flathead and Phillips screwdrivers, for handle screws and decorative caps
- Adjustable wrench or channel-lock pliers, for packing nuts and stem nuts
- Allen wrench (hex key) set, for set screws on cartridge handles (typically 4mm or 5mm)
- Needle-nose pliers, for retaining clips on cartridges
- Seat wrench, for replacing a corroded valve seat (compression faucets only)
- Replacement washers and O-ring kit, bring the old part to match the size exactly
- Replacement cartridge, match to manufacturer and model number if possible
- Plumber’s grease, coat rubber parts before reinstalling
- Penetrating oil (e.g., WD-40), for stem nuts or handles that haven’t moved in years
- Bucket or towels, the line holds residual water even after shutoff
Two notes specific to bathtub faucets: the packing nut on a tub stem is often recessed several inches inside the wall opening, requiring a deep socket or a tub faucet seat wrench rather than a standard adjustable wrench. And older chrome or brass fittings may be corroded enough to round off with an aggressive tool, a toothless plumber’s wrench or strap wrench protects the finish and grip.

How to Fix a Two-Handle (Compression/Stem) Bathtub Faucet
Two-handle compression faucets, the most common type in older bathtubs, leak when the rubber seat washer on the stem wears down and can no longer form a watertight seal against the valve seat. Replacing the washer costs under $3 and takes about 45 minutes. Here’s the complete process.
- Turn off the water supply valves. Locate the shutoff valves for the bathtub, usually accessible through an access panel on the opposite side of the wall, or under a neighboring closet. Turn both hot and cold valves fully clockwise. If no dedicated shutoffs exist, turn off the main house supply.
- Open the faucet to drain residual water. Turn both handles to the open position and let any remaining water run out before disassembling anything.
- Remove the decorative handle caps and screws. Use a flathead screwdriver to pry off the plastic or metal cap on top of each handle, it covers a screw head underneath. Remove that screw (usually Phillips) and pull the handle straight off. If it’s stuck, wiggle gently or apply penetrating oil around the base and wait 10 minutes.
- Unscrew the packing nut. With the handle removed, the packing nut or bonnet nut is visible. Turn it counterclockwise with an adjustable wrench. In tub faucets, this nut is often recessed, use a deep socket or the correct tub wrench size if a standard wrench won’t reach.
- Pull out the stem. Grip the stem and pull it straight out. If it won’t move freely, turn it counterclockwise while pulling, it threads into the valve body on some older designs.
- Inspect the seat washer and O-ring. The rubber seat washer is at the bottom of the stem, usually held by a brass screw. Examine it: if it’s flattened, cracked, or has a groove worn into it, that’s your culprit. Also check the O-ring around the middle of the stem, a damaged O-ring causes leaks around the handle base rather than from the spout.
- Replace the worn parts and reassemble. Unscrew the brass screw, swap in the matching replacement washer, and coat it lightly with plumber’s grease. If the O-ring is worn, cut it off and roll on the correct size replacement. Slide the stem back into the faucet body, thread on the packing nut snugly (don’t overtighten), replace the handle, and restore water supply. Test for leaks before replacing the decorative caps.
If the faucet drips again within a few weeks of a new washer, the valve seat is probably scored or pitted. A seat wrench can resurface or replace it, or a plumber can do it in under 30 minutes.
“I had a leaky tub faucet and was debating whether to fix it myself or wait for a plumber. The packing nut was in so far that a regular wrench wouldn’t reach it, ended up needing a deep socket and an extension. Once I had the right tool it took about 30 minutes.”— r/Plumbing · View discussion, May 2021
How to Fix a Single-Handle Cartridge Tub Faucet
A single-handle cartridge faucet leaks when the internal cartridge, a sealed plastic or brass cylinder that controls both water flow and temperature, wears out or shifts out of alignment. Replacing the entire cartridge is the standard repair: it’s faster and more reliable than trying to rebuild the old one. The process takes 30 to 45 minutes.
- Turn off the water supply. Same as above, shut off the dedicated tub valves or the main supply, then open the handle to release residual pressure and drain the line.
- Remove the handle. Look for a set screw under a decorative cap or on the underside of the handle. Use the correct Allen wrench size (usually 4mm) to loosen it, then pull the handle off. Some single-handle tub faucets have a snap-on cover plate (escutcheon) behind the handle, unscrew it to expose the cartridge retaining nut.
- Note the cartridge orientation before removing it. Take a photo with your phone. Cartridges must be reinstalled in exactly the same rotational position or the hot and cold will be reversed. Mark the top of the cartridge with a marker before pulling it.
- Remove the retaining clip and pull the cartridge. Use needle-nose pliers to remove the small U-shaped retaining clip at the top of the cartridge. Grip the cartridge stem with pliers and pull straight up, it should slide out cleanly. If it’s stuck, a cartridge-puller tool (available for $10 at hardware stores) grips the stem and pulls it out without damaging the faucet body.
- Match and install the replacement cartridge. Bring the old cartridge to the hardware store and match it by brand and model, or photograph the model number printed on the faucet body. Coat the O-rings on the new cartridge with plumber’s grease before insertion. Align it to the same orientation as the original and press it down firmly until it seats.
- Reinstall the retaining clip, handle, and cover plate. Replace the clip, attach the handle, and restore the water supply gradually. Test by slowly opening the supply valve and turning the handle through its range of motion before fully restoring water pressure.
Replacing a cartridge costs $15 to $40 depending on the brand. Moen, Delta, and Kohler all sell direct replacement cartridges for their specific models, and generic cartridges are available for most other brands. Using a manufacturer-matched cartridge is worth the extra few dollars, it comes with the correct O-ring dimensions and rated sealing pressure for that faucet body.
How to Fix a Leaky Tub Spout
A leaky tub spout, water dripping from the spout even when both handles are fully off, or water continuing to trickle from the spout while the shower is running, is a separate problem from a leaky handle. The spout itself doesn’t usually contain the mechanism that causes the drip. The issue is almost always either the stem valve behind the wall (the same repair as the compression faucet section above) or a failed diverter valve inside the spout.
The diverter is the mechanism that redirects water from the tub spout up to the showerhead when you lift the diverter knob or push the lever. When its internal spring or rubber seal wears out, water splits between the tub and the shower, or the spout continues dripping even with the diverter activated. According to Plumbing Manufacturers International, diverter components typically last 10 to 15 years under normal use before the internal seal degrades.
Replacing a slip-fit tub spout (most common type):
- Look underneath the spout for a small Allen screw. If you see one, it’s a set-screw type, loosen that screw and slide the spout off the copper pipe stub-out.
- If there’s no set screw, the spout is threaded directly onto the pipe. Grip it firmly and turn counterclockwise to unscrew it. Wrap a cloth around it to protect the finish.
- Inspect the diverter assembly at the back of the removed spout. On many spouts, the diverter is not serviceable separately, the most cost-effective fix is a complete spout replacement, which runs $15 to $60 at hardware stores.
- Install the new spout by threading it on clockwise or aligning it with the set screw, and test the diverter function before assuming the repair is complete.
Here’s the detail that most repair guides skip: the gap between the back of the spout and the wall tile needs to be watertight. If water infiltrates that gap every time the tub fills, it can damage the wall framing over time. Apply a thin bead of silicone caulk around the back edge of the new spout after installation, wipe it smooth with a wet finger, and let it cure 24 hours before running the tub.
When to Call a Plumber Instead
Most bathtub faucet repairs are genuinely doable as DIY projects. But several situations make professional help the smarter call, either because the problem is more serious, the access is impossible, or the repair requires tools that only a plumber would own.
| Situation | Recommendation | Typical Cost |
|---|---|---|
| No dedicated shutoff valves for the tub | Call a plumber to install isolation valves first | $150–$300 |
| Valve seat is scored or corroded beyond a washer fix | Plumber resurfaces or replaces the seat | $125–$250 |
| Access panel doesn’t exist and wall must be opened | Professional repair + drywall patch | $200–$450 |
| Pipes corroded or fittings stripped during DIY attempt | Call immediately; don’t force it further | $150–$400 |
| Drip reappears within 2 weeks of a new washer | Valve seat damage, needs resurfacing | $100–$200 |
According to Angi’s 2024 plumbing cost data, hiring a licensed plumber to fix a standard bathtub faucet runs between $125 and $350, covering the service call and parts. That’s a reasonable investment when the alternative is a stripped fitting or, worse, water damage inside the wall cavity. Some repairs simply have consequences that extend well beyond the cost of a service call, and recognizing that point before things get worse is part of knowing when the job is done right.
Frequently Asked Questions
How long does it take to fix a dripping bathtub faucet?
Most bathtub faucet repairs take 30 to 60 minutes for a first-timer once the water is shut off. Replacing a seat washer on a compression faucet is the quickest repair; replacing a cartridge on a single-handle faucet adds a few minutes for sourcing the correct part. If the shutoff valves are hard to access or corroded fittings slow disassembly, plan for up to 90 minutes.
Do I need to turn off the main water supply to fix a leaky tub faucet?
You need to shut off the water supply to the tub, but not necessarily the whole house. Most homes have dedicated shutoff valves for the tub, accessible via an access panel on the opposite wall or in an adjoining closet. If no dedicated valves exist, shutting off the main supply is the only safe option, and adding isolation valves during the repair is worth the extra cost.
How much do replacement parts cost for a bathtub faucet?
A seat washer and O-ring kit costs $3 to $8. A replacement cartridge for a name-brand faucet (Moen, Delta, Kohler) runs $15 to $40. A new tub spout with integrated diverter costs $15 to $60. If you also need a valve seat replacement or a packing nut kit, budget another $5 to $20. Total parts for most bathtub faucet repairs stay under $50.
What’s the difference between a compression faucet and a cartridge faucet?
A compression faucet uses a rubber washer that gets physically compressed against a valve seat when you turn the handle clockwise, creating the water seal. A cartridge faucet uses a sealed cylindrical cartridge that slides or rotates to open and close water ports. Compression faucets require more turning force and wear washers more quickly; cartridge faucets operate smoothly but require a full cartridge replacement when they fail.
Why does my tub spout drip only when the shower is running?
If water drips from the tub spout while the shower is running, the diverter valve inside the spout has failed. The diverter’s job is to redirect 100% of the water flow up to the showerhead; a worn diverter allows some water to bypass back through the spout. Replacing the entire tub spout is usually more cost-effective than rebuilding the diverter mechanism, since most spouts sell for $15 to $60 complete.
After replacing a cartridge, my hot and cold are reversed. What happened?
The cartridge was installed rotated 180 degrees from its correct orientation. Cartridges have a specific up-facing notch or tab that aligns with a slot in the faucet body. Remove the cartridge, rotate it 180 degrees, and reinstall. This is why photographing the orientation before removal prevents a second disassembly.
When should I replace the whole faucet instead of repairing it?
Replace the faucet rather than repairing it when: the faucet body is visibly corroded or cracked, replacement parts are no longer available for an older model, you’ve replaced the washer or cartridge twice in two years and it keeps leaking, or the valve seat is scored so badly it can’t be resurfaced. According to the National Association of Home Builders, faucets typically last about 15 years, after that threshold, a $50 to $200 replacement faucet often makes more economic sense than continued repairs.
The Bottom Line
Knowing how to fix a leaky faucet tub is one of the most practical plumbing skills a homeowner can have. A leaky bathtub faucet is almost always fixable in under an hour. The key steps are the same across faucet types: shut off the water, disassemble the handle, replace the worn component (washer, O-ring, or cartridge), and reassemble in reverse order. The bathtub-specific challenges, recessed packing nuts, wall-mounted access, and the tub spout diverter, are manageable once you know they’re coming.
Start by identifying whether the drip is coming from the handles or the spout, and whether you have a compression or cartridge design. That single decision routes you to the right repair, the right part, and the right tool before you ever shut off the supply valve.