A Delta bathroom faucet dripping from the spout is almost always a worn cartridge, a tired spring and seat, or a dried-out O-ring. Unlike a tub faucet that requires you to work through a hole in the wall, a bathroom sink faucet gives you access from underneath the sink. The repair is faster, easier, and harder to mess up because you can see what you are doing.
The job takes 20 to 40 minutes, costs $15 to $50 in parts, and requires no plumbing experience beyond turning a wrench. Here is how to fix both the modern ceramic cartridge type and the older ball-type Delta faucets you will find in bathrooms built before the mid-2000s.
Which Delta Bathroom Faucet Do You Have
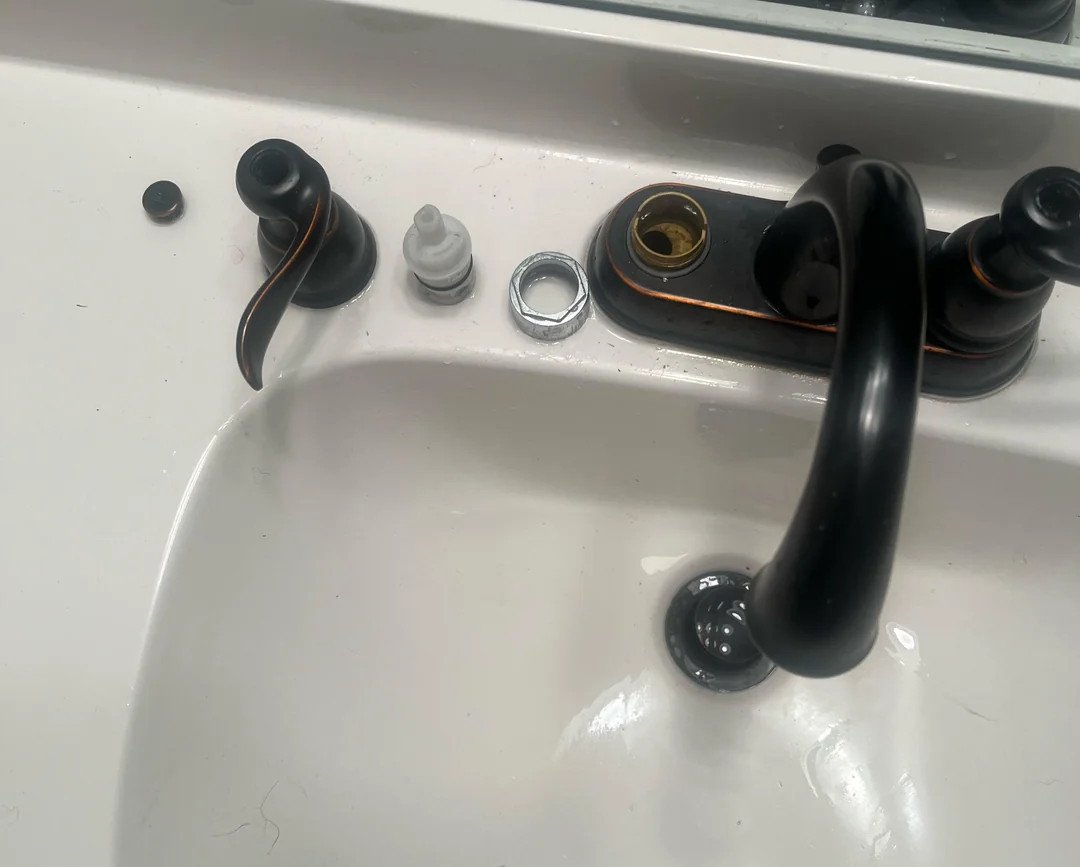
Delta bathroom faucets fall into three groups. The easiest way to identify yours is by the handle. A single lever handle that lifts up and swivels side to side uses a ceramic cartridge, typically Delta part number RP25513 or RP46074. This is the modern design found in most bathrooms built since the early 2000s. Two separate handles for hot and cold use rubber washers and seats, which are a $2 fix covered at the end of this guide. A single knob handle on a round ball-shaped base that swivels in all directions uses a Delta ball-and-cam assembly. This is the older design common in bathrooms from the 1980s and 1990s.
The ball-type faucet is the one that confuses people. The handle looks like a joystick on a round base. Under the handle is a slotted plastic or metal cap, which threads onto the faucet body and holds a rotating ball with slots and holes. A worn ball or dried-out seals cause leaks from both the spout and the base of the handle. The repair kit is Delta part number RP3614 for most models.
What You Need
| Item | Estimated Cost | Purpose |
| Delta ceramic cartridge (RP25513 or RP46074) | $30–$50 | For single-lever models |
| Delta ball and cam repair kit (RP3614) | $20–$35 | For ball-type models |
| Delta spring and seat kit (RP4993) | $5–$10 | For ceramic cartridge models |
| Plumber’s silicone grease | $5–$8 | Lubricates O-rings |
| Allen wrench set or hex keys | $5–$15 | Handle set screw removal |
| Needle-nose pliers | $10–$20 | Removing springs, seats, and retainer clips |
| Adjustable wrench or channel locks | $15–$25 | Removing cartridge retainer nuts |
You will also need a towel for the cabinet floor and a drain plug or rag to block the sink drain. Small parts gravitate toward open drains.
Single-Lever Ceramic Cartridge Faucet Repair
Step One: Shut Off the Water
Look under the sink. There are two shutoff valves on the wall, one for hot and one for cold. Turn both clockwise until they stop. Open the faucet to release pressure and drain the water in the lines. If the valves are stuck or do not fully shut off the water, turn off the main house supply. Old shutoff valves that have not been operated in years often seize. If a valve handle will not turn at all, stop and use the main shutoff rather than forcing it, which can break the valve and flood the cabinet.
Step Two: Remove the Handle
The handle set screw is on the underside of the lever, near the base. On some models it is hidden behind a small plastic cap on the front face of the handle. Pry off the cap with a flathead screwdriver to expose the screw. Loosen the set screw with an Allen wrench, typically 1/8 inch or 3/32 inch. Do not remove it completely. Lift the handle off.
Under the handle is a domed metal or plastic cap that threads onto the faucet body. This is the cartridge retainer nut. Unscrew it by hand or with an adjustable wrench if it is tight. Wrap the wrench jaws with a rag to avoid scratching the chrome finish. Under the retainer nut is the cartridge.
Step Three: Replace the Cartridge, Springs, and Seats
Remove the retainer clip if one is present. It is a small U-shaped brass or plastic piece that slides out of the valve body. Pull the old cartridge straight up and out. If it is stuck, grip it with pliers and pull firmly. White vinegar soaked into the valve body for 20 minutes dissolves mineral deposits that lock the cartridge in place.
Inside the valve body are two small rubber seats with metal springs behind them. Remove both with needle-nose pliers. These are the same RP4993 spring and seat kit used in Delta tub faucets. The springs weaken and the rubber hardens over time. Replacing them is the most important step. A new cartridge with old springs and seats still leaks.
Install the new springs and seats. The narrow end of each spring goes into the rubber seat. The wide end faces down into the valve body. Press each assembly into its recess. Both sides should feel identical when pressed.
Coat the O-rings on the new cartridge with a thin layer of silicone grease. Slide the cartridge into the valve body with the hot side on the left, matching the orientation of the old cartridge. Reinstall the retainer clip. Thread the retainer nut back on and tighten it snugly by hand. Overtightening with a wrench can crack the nut or the cartridge.
Step Four: Reassemble and Test
Turn the water back on slowly at the shutoff valves under the sink. Check for leaks at the cartridge and valve body. Operate the handle through the full range. Water should stop completely in the off position. Reinstall the handle and tighten the set screw. Snug is enough.
Ball-Type Faucet Repair
The ball-type Delta bathroom faucet uses a rotating ball with slots that align with hot and cold water inlets. The ball is held in place by a threaded cap with an adjustment ring underneath and a cam that pushes the ball against two rubber seals and springs. When any of these wear out, water leaks from the handle base or drips from the spout.
Remove the handle by loosening the set screw on the underside of the lever. Unscrew the domed cap on top of the faucet body. Under the cap is a plastic adjustment ring with notches around its perimeter. Lift it off. Under that is the cam, a white or gray plastic piece shaped like a washer with a tab that fits into a notch on the valve body. Lift the cam out. Under the cam is the ball itself. Lift the ball out by its stem.
Inside the valve body you will see two rubber seats with springs behind them. Remove them with needle-nose pliers. These are the same spring-and-seat design as the ceramic cartridge models except the springs and seats are oriented horizontally in the ball-type faucet rather than vertically. The wide end of the spring faces outward toward the ball. Install the new springs and seats from the RP3614 kit. Press them in until they are fully seated.
Check the ball. If it has visible scratches, pits, or dark wear marks on the surface, replace it. The kit includes a new ball. If the ball is clean and smooth, you can reuse it. Check the cam. If the plastic is cracked or the surface that presses against the ball is grooved, replace it. The kit includes a new cam.
Place the new ball into the valve body with the alignment pin on the ball fitting into the notch in the valve body. Place the new cam on top of the ball with the tab fitting into the same notch. Place the adjustment ring on top of the cam. Thread the cap back on. Adjust the ring by turning it with the tool included in the kit or with the tips of needle-nose pliers inserted into the notches. The ring controls how tightly the cam presses the ball against the seals. Tighten it until the handle moves smoothly with slight resistance. If the handle is stiff to move, the ring is too tight. If the handle is loose and water leaks from the base, the ring is too loose. Find the point where the handle moves freely and no water leaks.
Two-Handle Faucet Repair
Two-handle Delta bathroom faucets are the simplest repair. Each handle controls a stem with a rubber washer at the bottom. Turn off the water under the sink. Pop off the decorative cap on top of the handle to expose the handle screw. Remove the screw and pull the handle off. Unscrew the stem from the faucet body with an adjustable wrench. The stem has a small rubber washer held by a brass screw on the bottom. Replace the washer. Inspect the brass seat inside the faucet body where the washer presses. If it feels rough or pitted, replace it with a seat wrench. Reassemble. This is a $2 fix that takes 10 minutes per handle.
Frequently Asked Questions
Will Delta send me free replacement parts for a bathroom faucet?
Yes. Delta covers all faucets with a lifetime warranty on internal components including cartridges, ball assemblies, springs, and seats. Call Delta customer service or submit a request through their website. You will need the faucet model number, which is usually stamped on the underside of the spout or on the original packaging. Shipping is free. The wait is typically one to two weeks. If you need the repair completed today, buy the parts at a home center and keep the free replacements as spares.
Water is leaking from the base of the handle, not the spout. Is the fix different?
A leak from the handle base means the O-ring on the cartridge stem has failed or the cartridge retainer nut is loose. On a ceramic cartridge model, try tightening the retainer nut first. If the nut is tight and the leak continues, the cartridge O-ring has worn out and the cartridge needs replacement. On a ball-type model, the adjustment ring is either too loose or the ball and seals are worn. Tighten the ring in small increments using the adjustment tool or needle-nose pliers until the leak stops. If tightening does not stop the leak, replace the ball and seals with the RP3614 kit.
My faucet has low water pressure after the repair. What did I do wrong?
Debris from the old springs, seats, or mineral deposits likely entered the water line during the repair and is now lodged in the aerator. The aerator is the small screen at the tip of the spout. Unscrew it by hand, rinse the screen under running water, and reinstall it. If the pressure is still low, remove the aerator again and open the faucet without the aerator installed to flush any remaining debris out of the spout. Run the water for 30 seconds, then reinstall the clean aerator.