Grouting shower tile is not difficult. It is tedious. The technique is simple. The timing is unforgiving. Wait too long to wipe and the grout hardens on the tile surface. Wipe too soon and you pull grout out of the joints. The difference between a professional-looking shower and a sloppy one is not skill. It is patience with the sponge.
Grouting a standard shower surround takes three to five hours including mixing, application, cleaning, and final haze removal. It costs $30 to $80 in materials. Here is how to choose the right grout, apply it correctly, and clean it before it sets permanently.
Choosing the Right Grout for a Shower
Showers need grout that resists water, mold, and mildew. You have three choices, and the right one depends on your tile spacing and your tolerance for maintenance.
Sanded grout is for joints wider than 1/8 inch. The sand adds strength and prevents the grout from shrinking and cracking as it cures in wider gaps. Use sanded grout for most floor tile and for wall tile with joints of 1/8 inch or larger. It is the most common choice for shower walls with standard ceramic or porcelain tile.
Unsanded grout is for joints 1/8 inch or narrower. It is smoother and sticks better to vertical surfaces in thin gaps where sanded grout would fall out. Use unsanded grout for polished stone tile, glass tile, and any tile with narrow joints where sand would scratch the surface.
Epoxy grout is the premium option. It is waterproof, stain-proof, and never needs sealing. It also costs three to four times as much as cement-based grout, has a shorter working time, and is harder to apply. Epoxy grout is the best choice for a shower that you never want to think about again. It is the wrong choice for a first-time grouting project because once it starts to set, you cannot recover. Cement-based grout forgives mistakes. Epoxy does not.
For a standard ceramic tile shower with 1/8-inch joints, use sanded cement-based grout with a polymer additive for flexibility and water resistance. Most modern grouts include the polymer in the mix. If your grout bag says polymer-modified or includes a liquid additive instead of water for mixing, use it. The polymer improves adhesion and reduces water absorption.
What You Need
| Item | Estimated Cost | Purpose |
| Grout (sanded, unsanded, or epoxy based on joint width) | $15–$40 | Filling tile joints |
| Grout sealer (if using cement-based grout) | $10–$20 | Post-cure waterproofing |
| Rubber grout float | $8–$15 | Pressing grout into joints |
| Grout sponge (high-density, rounded edges) | $5–$10 | Wiping excess grout without pulling it from joints |
| Two 5-gallon buckets | $10–$15 | One for grout mixing, one for clean water |
| Margin trowel or mixing paddle for drill | $5–$15 | Mixing grout to smooth consistency |
| Microfiber cloths or cheesecloth | $5–$10 | Final haze removal |
| Silicone caulk (color-matched to grout) | $8–$12 | Changes of plane: corners, wall-to-tub, wall-to-floor |
Before You Start: Prep the Tile and Protect the Shower
Grout bonds to clean, damp tile. Remove any spacers still in the joints. Scrape out any thinset mortar that squeezed up between the tiles during installation. The joints must be at least two-thirds clear for the grout to fill them properly and bond to the tile edges. Use a utility knife or a grout removal tool to clean out the joints. Vacuum the joints and the tile surface to remove all dust and debris.
Tape off the shower valve, the showerhead arm, and any niches or shelves with painter’s tape. Grout is abrasive. It will scratch chrome, brushed nickel, and oil-rubbed bronze finishes if it sits on them. Tape the drain cover or stuff a rag in the drain to prevent grout from washing down the pipes. Grout hardens underwater and will clog a P-trap.
If you are grouting over natural stone, glass, or polished porcelain tile that is easily scratched, test a small amount of grout on a scrap tile or an inconspicuous area. Sanded grout scratches polished surfaces. If the test leaves scratches, switch to unsanded grout.
Step One: Mix the Grout
Pour the grout powder into a clean bucket. Add water or the liquid additive a little at a time while mixing. The correct consistency is smooth peanut butter. Grout that is too wet will shrink and crack as it cures. Grout that is too dry will not spread and will not bond to the tile edges. If you tip the bucket and the grout slowly slumps, it is right. If it pours like a milkshake, add more powder. If it holds its shape like cookie dough, add more liquid.
Mix only as much grout as you can apply in 30 minutes. Cement-based grout begins to set within 30 to 45 minutes of mixing. A 10-pound box of grout covers approximately 50 to 100 square feet of tile depending on tile size and joint width. For a standard tub surround of 60 to 80 square feet, mix half the box at a time.
Let the grout slake after mixing. Slaking means letting the mixed grout sit undisturbed for 5 to 10 minutes, then remixing briefly. This allows the chemicals to fully activate and the water to fully absorb into the powder. Grout that is not slaked is weaker and more prone to cracking. Every bag of grout specifies a slake time on the instructions. Read it.
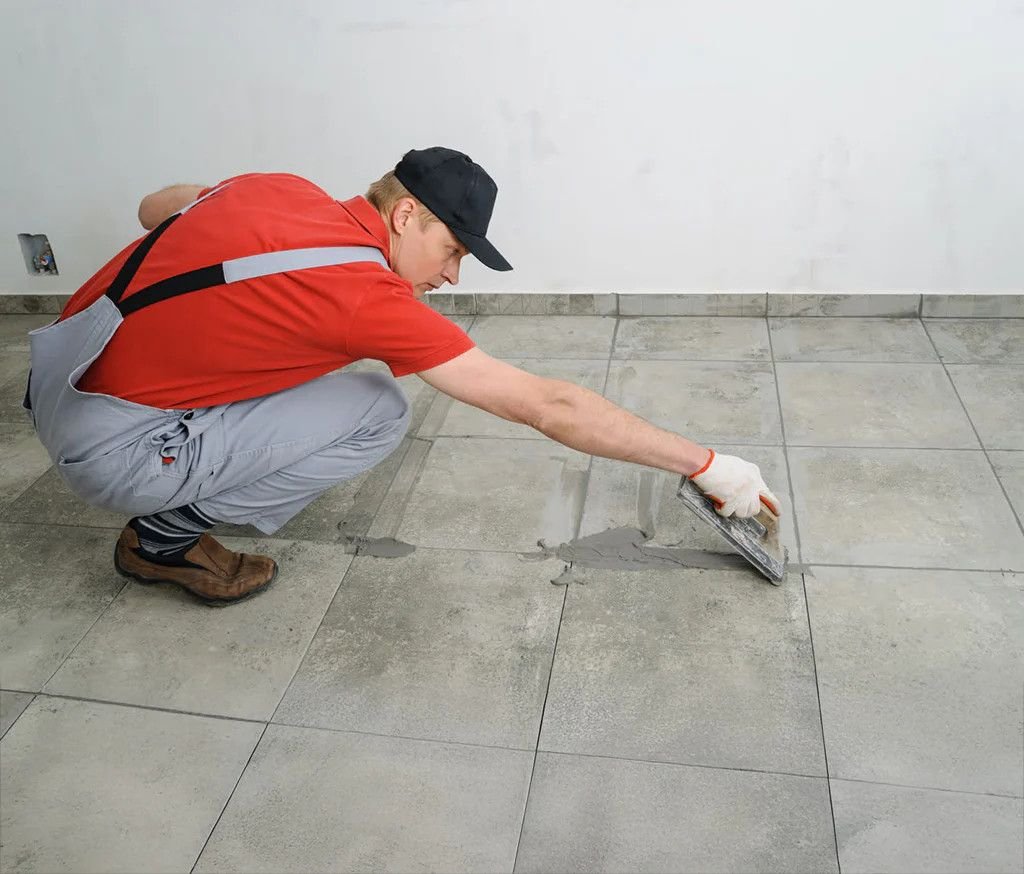
Step Two: Apply the Grout
Load grout onto the end of the rubber float. Scoop a softball-sized amount onto the float, not into the center. Press the float against the tile at a 45-degree angle and spread the grout diagonally across the joints. Diagonal strokes force the grout into the joints rather than dragging it out. Work in sections of roughly 10 square feet, which is about the area you can grout and begin cleaning before the grout skins over.
Pack the joints fully. Go over each section from multiple directions. The joints should be completely filled with no voids, air pockets, or low spots. A grout joint with a void is a future crack and a path for water.
After packing the joints in a section, hold the float at a steeper angle, nearly 90 degrees to the tile, and scrape the excess grout off the tile surface. This removes the bulk of the grout before it hardens and makes the sponge cleanup faster. Work quickly. The grout is curing while you work.
Step Three: Sponge Clean in Three Passes
Wait 15 to 30 minutes after applying the grout before the first sponge pass. The grout in the joints should be firm enough that pressing it with a finger leaves only a slight impression. If the grout smears when you touch it, wait longer. If it is rock hard, you waited too long and cleanup will be a battle.
First pass. Fill a bucket with clean water. Dampen the grout sponge and wring it out until it is almost dry. A wet sponge introduces too much water into the grout joints, weakening them and washing out the color. Wipe the tile surface in a circular motion to loosen the grout haze. Rinse the sponge frequently. The water in the bucket should be changed often, every few square feet for the first pass. Dirty water smears grout back onto the tile.
Second pass. Wait another 15 to 30 minutes. Fill the bucket with fresh clean water. Wipe with a damp sponge, this time in a diagonal motion across the joints, with light pressure. The goal is to smooth the grout joints and remove the remaining haze without digging grout out of the joints. Rinse and wring the sponge after every few tiles. If the sponge drags grout out of the joints, you are pressing too hard or the grout is not firm enough. Wait longer.
Third pass. After the grout has cured for 2 to 3 hours, a light haze will remain on the tile surface. Buff it off with a dry microfiber cloth or cheesecloth. The haze wipes off as a fine powder. If it smears, the grout is not cured enough. Wait and try again later. The haze will wipe off easily once the grout is dry. Do not add more water. A damp cloth at this stage reactivates the grout and makes the haze worse.
Step Four: Caulk the Changes of Plane
Grout cracks where walls meet walls, where walls meet the tub or shower pan, and around fixtures. These are called changes of plane, and they move slightly with temperature and humidity changes. The grout cannot flex. The caulk can. Every corner in the shower, every joint between the tile and the tub, and every penetration for the showerhead, valve, and tub spout gets caulk, not grout.
Wait at least 24 hours after grouting for the grout to cure fully before caulking. Fill the tub with water before caulking the joint between the tile and the tub. The weight of the water pulls the tub down slightly, opening the joint to its maximum width. If you caulk with the tub empty and then fill it, the movement stretches and tears the caulk. Caulk with the tub full.
Use color-matched silicone caulk made for kitchens and baths. Silicone is flexible, waterproof, and mold-resistant. Acrylic caulk is not suitable for showers. It absorbs water and grows mold. Remove the painter’s tape from the surrounding joints. Apply a thin, continuous bead of caulk into the joint. Tool it smooth with a wet finger or a caulk-smoothing tool within two to three minutes of application. Remove any excess immediately with a damp paper towel. Silicone caulk skins over quickly and is difficult to clean up once it begins to cure.
Step Five: Seal the Grout
Cement-based grout is porous. It absorbs water, soap scum, and body oil. Sealing fills the microscopic pores and creates a barrier that repels water and stains. Epoxy grout does not need sealing.
Wait three to seven days after grouting before sealing. The grout must cure fully. Sealing too early traps moisture inside the grout and weakens it. The grout should be completely dry. In a bathroom with an exhaust fan, three days is usually sufficient. In a humid bathroom without ventilation, wait a full week.
Apply the sealer with a small foam brush, a roller bottle with a felt tip designed for grout sealing, or a clean cloth. Apply to the grout joints only. Wipe any sealer that gets on the tile surface off immediately with a dry cloth. Most sealers require two coats applied an hour apart. The grout should darken slightly when the sealer is first applied, then lighten as it dries. If the sealer beads up on the surface instead of absorbing, the grout already has a sealer in it from the factory or the previous application is still effective.
Reapply sealer every one to two years. The sealer wears away with cleaning and water exposure. A properly sealed shower stays cleaner longer and resists mold growth between the tiles.
Frequently Asked Questions
Can I grout over old grout?
No. New grout will not bond to old grout. The thin layer will crack and fall out within weeks. If the old grout is stained or discolored but structurally sound, clean it with a grout brush and oxygen bleach, then apply a grout colorant and sealer. If the old grout is cracked, crumbling, or missing, remove at least two-thirds of the joint depth with a grout saw or oscillating multi-tool before applying new grout. The new grout needs fresh tile edges to bond to.
Why did my grout crack within a week of installation?
Three common causes. The grout was mixed with too much water, which causes excessive shrinkage as it cures. The grout was applied in joints at a change of plane, such as a corner or where the wall meets the tub, where movement cracked it. The grout dried too fast because the tile or the room was too hot or a fan was blowing directly on the grout. Slow curing produces stronger grout. In hot dry conditions, mist the grout lightly with water a few hours after application to slow the cure.
My tile has narrow joints but the gap around the edge is wider. Which grout do I use?
Use unsanded grout for the narrow joints. For the perimeter gap between the tile and the tub, wall, or ceiling, do not use grout at all. That gap is a change of plane and gets caulk, regardless of its width. The grout type decision applies only to the joints between tiles on the same surface plane. Changes of plane are always caulk, never grout.