A pallet deck costs $300 to $800 in materials compared to $2,000 to $5,000 for a traditional pressure-treated lumber deck of the same size. The trade-off is your time, the variability of the material, and a shorter lifespan. A well-built pallet deck lasts 5 to 10 years with proper sealing and maintenance. A traditional deck lasts 15 to 25 years.
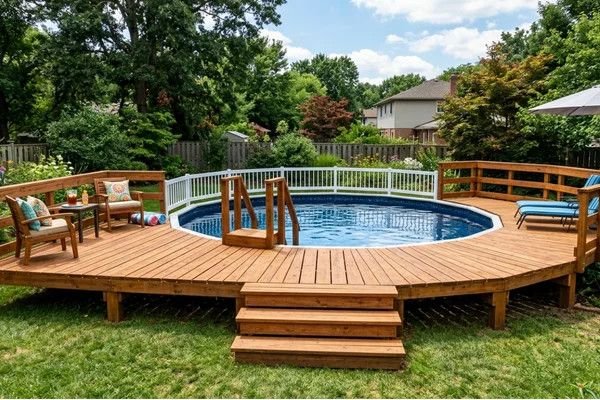
For a backyard sitting area, a platform for a fire pit, or a temporary deck while you save for a permanent one, pallets are a legitimate building material. They are not a shortcut to a permanent deck. Here is how to source the right pallets, prepare them, and build a deck that is level, safe, and looks better than you expect.
Finding the Right Pallets: Most Are Wrong for Decking
Not all pallets are suitable for a deck. Most are made of cheap softwood, have been exposed to chemicals, or are too damaged to use. You need heat-treated pallets marked with HT, which means they were sterilized with heat rather than methyl bromide, a toxic fumigant. Avoid pallets stamped MB. Avoid pallets that are stained with oil, grease, or unknown liquids. Avoid pallets that have obviously carried chemicals, fertilizers, or industrial products.
Look for pallets made of oak or other hardwoods. These are heavier, denser, and will last years longer than pine pallets. Oak pallets are typically used for shipping heavy items like machinery, tile, and stone. They are worth the extra effort to find.
Sources for pallets include construction sites, which often have pallets from brick, block, and lumber deliveries. Industrial parks and warehouse districts where pallets accumulate at loading docks. Hardware stores and garden centers that receive bulk shipments on pallets. Online marketplaces like Craigslist and Facebook Marketplace where people give them away for free. Always ask permission before taking pallets from a business. Pallets behind a loading dock are company property, not free for the taking.
For a 10-foot by 10-foot deck, you need approximately 20 to 25 standard pallets measuring 40 inches by 48 inches. Collect 25 to 30 to account for damaged boards discovered during disassembly. Pallets are free or cost $2 to $5 each if purchased.
Tools and Materials You Will Need
| Item | Estimated Cost | Purpose |
| Pallets (25–30, heat-treated, hardwood preferred) | $0–$150 | Primary decking material |
| Pressure-treated 2×4 lumber (6–8 pieces, 10 ft) | $60–$100 | Frame and joists underneath the pallets |
| Gravel (1–2 cubic yards) | $40–$80 | Base layer for drainage and leveling |
| Concrete deck blocks or pavers (8–12) | $40–$80 | Foundation supports |
| Deck screws, 3-inch exterior (5 lb box) | $30–$40 | Fastening pallets to frame |
| Exterior wood sealer or deck stain (2 gallons) | $50–$80 | Weather protection |
| Landscape fabric (optional) | $20–$30 | Weed barrier under deck |
Tools needed: circular saw or reciprocating saw with demolition blades, pry bar or pallet buster, hammer, drill with screwdriver bits, orbital sander with 60-grit and 120-grit sandpaper, level, tape measure, shovel, rake, and tamper. A pallet buster is a specialized pry bar designed for disassembling pallets without splitting the boards. It costs $30 to $50 and is worth every dollar if you are disassembling more than a few pallets.
Step One: Disassemble and Prepare the Pallets
Disassembly is the most labor-intensive part of the project. A single pallet takes 10 to 20 minutes to take apart depending on the tool you use and the pallet construction. Expect to spend a full weekend disassembling 25 pallets.
The pallet buster is the fastest method. Slide the fork under each board near the nail and lever it up. The board separates from the stringer with less splitting than using a hammer and pry bar. If you use a reciprocating saw, slide the blade between the board and the stringer and cut through the nails. This is faster but leaves nail pieces embedded in the wood that must be punched out or cut flush.
After disassembly, sort the boards by quality. The best boards become the top decking surface. Boards with splits, large knots, or damage become the frame underneath or are discarded. Remove all nails. A single missed nail will destroy a saw blade or a sander belt.
Sand every board that will be a walking surface. Start with 60-grit to remove splinters, rough spots, and stamp markings. Finish with 120-grit for a surface that is smooth enough for bare feet. This takes hours. It is the second most labor-intensive step after disassembly. Nobody who builds a pallet deck talks about the sanding. It is the reason most pallet decks look rough. Do not skip it.
Apply wood sealer or deck stain to the top boards before assembly. Sealing before installation coats all sides and edges of each board, including the ends that will be hidden after the deck is built. Unsealed end grain absorbs water and rots first. Two coats, applied with a brush or roller, add years to the deck’s life.
Step Two: Prepare the Ground and Foundation
A pallet deck is a ground-level structure. It should sit on a stable, well-drained base. Choose a level area or grade the ground to create one. Remove grass and organic material from the deck footprint plus six inches on each side.
Spread 2 to 3 inches of gravel over the entire footprint. Rake it level. Compact it with a hand tamper. The gravel provides drainage, prevents the wood from sitting in moisture, and creates a stable base for the foundation blocks. Skip the gravel and your deck sits in mud after every rain.
Lay landscape fabric over the compacted gravel to prevent weeds from growing through the deck. Overlap seams by 6 inches.
Place concrete deck blocks or solid concrete pavers on the gravel in a grid pattern, spaced approximately 4 feet apart in both directions. A 10-by-10 deck needs blocks at the corners and at 4-foot intervals, totaling 9 to 12 blocks. Use a level to ensure the tops of the blocks are even with each other. Add or remove gravel under individual blocks to adjust their height. The foundation blocks must be level and stable. The entire deck depends on them.
Step Three: Build the Frame
Lay pressure-treated 2-by-4 lumber across the concrete blocks to create the frame grid. The 2-by-4s run in one direction, spaced 4 feet apart, with cross pieces between them to create a grid that matches the size of your pallets. A standard pallet is 40 by 48 inches, so a frame grid with openings slightly smaller than 40 by 48 inches supports each pallet at its edges.
Screw the frame pieces together at each intersection with 3-inch exterior deck screws. Two screws per joint, driven at opposing angles for strength. The frame does not need to be attached to the foundation blocks. The weight of the deck holds it in place.
Check that the frame is level in both directions. Adjust by adding shims between the frame and the blocks. A deck that is 1 inch out of level over 10 feet is noticeable when you walk on it and annoying when furniture sits crooked.
Step Four: Install the Pallet Decking
If you disassembled the pallets completely, lay the sanded and sealed boards across the frame as you would for a traditional deck. Space the boards with a 1/8-inch gap between them for drainage and expansion. Screw each board to the frame with two screws at each frame contact point.
If you kept the pallets intact, which is faster but produces a rougher look, place each pallet directly on the frame grid. Screw through the pallet’s stringer boards into the frame with 3-inch screws, four screws per pallet. The pallet boards become the walking surface without the need to disassemble, sand, and reinstall each board individually. This method saves 20 to 30 hours of labor. The trade-off is a deck with irregular board spacing, pallet stamp markings, and a rougher texture. If this is an acceptable aesthetic for your use case, it is a legitimate shortcut.
If you use intact pallets with gaps between the boards that are wider than a half-inch, lay additional boards cut from spare pallets across the gaps to create a more uniform surface and prevent chair legs from falling through.
Step Five: Final Sealing and Edging
Apply a second coat of sealer to the top surface after installation. This coat covers screw heads, cut ends from trimming, and any areas that were scuffed during assembly.
Add fascia boards around the perimeter to hide the frame and foundation blocks. Pallet boards cut to length and screwed into the frame edges create a finished look. Paint or stain the fascia to match the deck surface.
Add a step if the deck height exceeds 8 inches, which is the maximum comfortable step height for most people. A pallet deck on a gravel base typically sits 4 to 6 inches above grade, which does not require a step. If your deck is higher due to sloping ground, build a step from pressure-treated lumber and pallet boards.
Maintenance and Lifespan Expectations
A pallet deck requires more maintenance than a pressure-treated deck. Reseal the surface every 1 to 2 years. Inspect for rot at the joints and where boards contact the frame each spring. Replace individual boards as they deteriorate. Pallets were not designed for decking. Expect to replace 10 to 20 percent of the surface boards by year 3 to 5 and potentially most of the deck by year 7 to 10.
If you used intact pallets rather than individual boards, the pallets themselves will sag between the frame supports as the fasteners loosen and the wood weakens. Tighten screws annually. Replace sagging pallets as needed.
The pressure-treated frame underneath will outlast the pallet surface. When the pallet boards need replacement, you can install new decking material over the existing frame. The frame is the permanent part of the structure. The pallets are the replaceable surface.
Permits and Building Codes
Most jurisdictions do not require a building permit for a ground-level deck under 200 square feet that is not attached to the house. A 10-by-10 pallet deck at 100 square feet falls under this threshold in most areas. Confirm with your local building department before starting. If your deck will be attached to the house, elevated more than 30 inches above grade, or exceed 200 square feet, a permit is almost certainly required regardless of the materials used.
Homeowners associations may have restrictions on deck materials, appearance, and placement even if the city does not require a permit. Review your HOA covenants before building.
Frequently Asked Questions
Are pallets safe to use for a deck?
Yes, if you use heat-treated pallets marked HT. These have been sterilized with heat, not chemicals. Avoid pallets marked MB, which indicates methyl bromide fumigation. Avoid pallets with visible chemical stains, oil, or unknown residues. The wood itself is safe for outdoor use once sealed. Do not use pallets that have carried food if they show signs of mold or bacterial growth, though heat-treated pallets used for food transport are generally safe.
Is a pallet deck cheaper than a real deck?
In materials, yes. A 10-by-10 pallet deck with a pressure-treated frame costs $300 to $800 in materials. A traditional pressure-treated deck of the same size costs $1,200 to $1,800 in materials. The labor difference is the hidden cost. Building a pallet deck takes 40 to 80 hours of work, mostly in disassembly and sanding. A traditional deck built from new lumber takes 15 to 25 hours. If you value your time at $20 per hour, the pallet deck’s labor cost is $800 to $1,600, erasing most of the material savings. Pallet decks are a money-saver for people who have more time than money.
How do I prevent my pallet deck from rotting?
Four things determine rot resistance. The gravel base keeps the frame above standing water. Sealing all six sides of each board before installation prevents moisture absorption. Annual resealing maintains the protective coating. Replacing individual boards at the first sign of rot prevents it from spreading. A pallet deck will always rot faster than a pressure-treated deck. The goal is to slow it down enough to get 5 to 10 years of use before the surface needs major replacement.