The basement is a concrete box. The floor is a concrete slab. The walls are poured concrete or concrete block. The ceiling is exposed floor joists with mechanicals running through them. It is cold, gray, and has been storing holiday decorations and forgotten exercise equipment since you moved in. Finishing this space turns it from a concrete box into usable living space. The process is not mysterious. It is a sequence of layers applied in order: moisture control, insulation, framing, utilities, drywall, flooring, and paint. Each layer depends on the one before it. Each layer is within the capability of a homeowner who can measure, cut, and follow instructions.
Phase 1: Moisture Test and Waterproofing
Concrete is porous. Water vapor moves through it. Before any finishing material touches the concrete, confirm the basement is dry enough to cover. Tape a 2-foot square of clear plastic sheeting to the bare concrete floor and to a bare concrete wall with duct tape on all four sides. Leave it for 48 hours. If condensation forms under the plastic, the concrete is transmitting moisture. Address the source before proceeding. Exterior waterproofing, interior drain tile with a sump pump, or grading and downspout corrections on the outside of the house may be required. Finishing over active moisture is the most expensive mistake in basement finishing. The finished space will be destroyed by the same water that was there before the drywall went up.
If the plastic test is dry, fill any cracks in the concrete with hydraulic cement. Apply a masonry waterproofing sealer to the walls and floor with a roller. The sealer is a vapor retarder that slows moisture transmission. It is not a substitute for exterior waterproofing, but for a dry basement it is sufficient preparation.
Phase 2: Insulation
Per wikiHow’s basement wall finishing guide, co-authored by home improvement specialist Ryaan Tuttle with over 17 years of experience, rigid foam insulation is the correct choice for basement walls because it resists moisture and provides a thermal break between the cold concrete and the interior space.
Extruded polystyrene rigid foam, minimum 1-inch thick, is glued directly to the concrete walls with foam-compatible adhesive. Tape all seams with insulation tape to create a continuous thermal break. In cold climates, building codes typically require R-10 on basement walls, which means 2-inch XPS. The floor may also be insulated with rigid foam beneath the finished flooring, particularly if the basement will be used as living space. A subfloor system of interlocking OSB panels with a built-in vapor barrier is an alternative that provides both insulation and a flat surface for flooring.
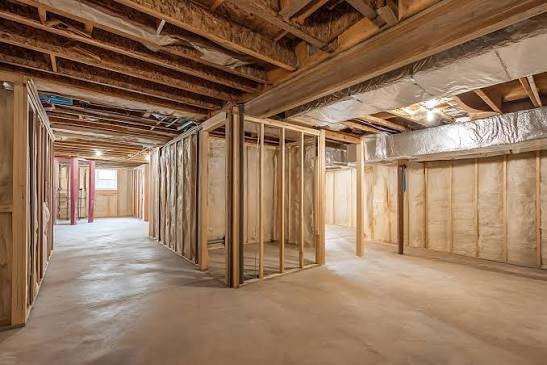
Phase 3: Framing
The framed walls stand in front of the insulated concrete, separated by a 1/2-inch to 1-inch gap. The gap is a drainage and drying plane. The bottom plate is pressure-treated lumber anchored to the concrete floor with Tapcon screws or powder-actuated fasteners every 24 to 36 inches. The top plate is standard lumber nailed to the ceiling joists above. Studs are 2×4, spaced 16 inches on center, cut individually to the measured distance between the plates at each position. The concrete floor is rarely perfectly level, and uniform-length studs leave gaps that crack the drywall.
Interior partition walls divide the space into rooms. They are framed the same way as exterior walls. The bottom plate on an interior wall does not need to be pressure-treated in a dry, conditioned basement. Door openings are framed with headers, king studs, and trimmer studs. The rough opening is the door width plus 2 inches and the door height plus 1 inch.
Phase 4: Electrical, Plumbing, and HVAC
This phase requires licensed trades and permits in nearly every jurisdiction. The electrician runs wiring for outlets, switches, and light fixtures. The plumber runs supply and drain lines for the bathroom, wet bar, or laundry. The HVAC contractor runs supply and return ducts or installs a mini-split system for heating and cooling. The rough-in work must be completed and inspected before the walls are closed with drywall.
The sequence is critical. Electrical and plumbing rough-in happen after framing and before insulation in the stud cavities, because the wires and pipes run through the studs. The HVAC ductwork may be installed before framing if it runs through the ceiling, or after framing if it runs through soffits. Coordinate the trades so the electrician, plumber, and HVAC contractor are not working in each other’s way. The general contractor handles this coordination in a professional project. The homeowner acting as their own GC schedules the subs in the correct order and ensures each has completed their work before the next begins.
Phase 5: Drywall
Moisture-resistant drywall, green board or purple board, is used for all basement walls. Standard drywall absorbs humidity and supports mold growth in the higher humidity of a below-grade space. The ceiling drywall is hung first, then the walls. Ceiling drywall is 5/8-inch thick for fire rating between the basement and the floor above. Wall drywall is 1/2-inch thick. Hang the drywall horizontally on the walls, which puts the long seams at working height. Leave a 1/2-inch gap at the floor to prevent moisture wicking from the concrete slab. The gap is covered by baseboard later.
Tape the seams with paper tape embedded in joint compound. Three coats: tape coat, fill coat, and finish coat. Each must dry before the next is applied. Sand the final coat smooth. The drywall phase takes the longest calendar time of any phase because the joint compound drying time cannot be rushed.
Phase 6: Flooring
Flooring goes in after painting so paint drips do not damage the finished floor. Luxury vinyl plank is the best flooring choice for a concrete basement. It is fully waterproof, installs as a floating floor over the concrete, and does not require a separate underlayment if it has an attached pad. Carpet over a concrete basement floor requires a vapor barrier and a subfloor to prevent moisture from condensing under the carpet pad, which creates mold and odor. Laminate is not recommended for concrete basement floors because the HDF core absorbs moisture and swells.
Phase 7: Paint and Trim
Prime the drywall with PVA primer. Paint with two coats of interior latex in the sheen appropriate for the room. Satin or eggshell for living areas. Semi-gloss for bathrooms. Install baseboard over the gap at the floor, nailed to the studs, not to the floor. Install door casing around all doors. Install window casing around any finished windows. Install the interior doors. Install outlet covers, switch plates, and light fixture trim.
How Long It Takes
| Phase | Pro (Working Days) | DIY (Weekends) |
| Moisture test and sealing | 1-2 | 1 weekend |
| Insulation | 1-2 | 1 weekend |
| Framing | 2-3 | 2-3 weekends |
| Electrical, plumbing, HVAC rough-in | 3-5 | N/A (pro only) |
| Drywall | 3-5 | 2-3 weekends |
| Painting | 1-2 | 1 weekend |
| Flooring | 1-2 | 1 weekend |
| Trim and finish | 1-2 | 1-2 weekends |
| Total | 13-23 days (3-5 weeks) | 9-12 weekends (3-4 months) |
Frequently Asked Questions
What is the one thing I should not get wrong in the sequence?
Do not install drywall before the electrical and plumbing rough-in inspection has passed. The inspector must see the wiring and plumbing before the walls are closed. If drywall goes up before the inspection, the inspector will require it to be removed in specific areas to verify the rough-in work. The drywall patches are visible forever. Schedule the rough-in inspection, wait for the inspector, and only then hang drywall.
Can I leave the concrete floor as-is and just paint it?
Yes. Painting a concrete basement floor is the least expensive flooring option. Clean the concrete, etch it with a concrete etching solution so the paint bonds, apply a concrete primer, and paint with two coats of concrete floor paint. The floor is still hard and cold, but it is sealed and the color is intentional. This is appropriate for workshops, utility rooms, and finished basements where the industrial aesthetic is desired. It costs $200 to $400 for 1,000 square feet, compared to $2,500 to $5,000 for LVP flooring.
The Room That Was a Concrete Box
A finished concrete basement is the largest transformation a house can undergo without adding square footage. The space was already there. It was just not usable. The moisture was controlled. The concrete was sealed and insulated. The framing defined the rooms. The drywall made the walls smooth. The paint gave them color. The flooring made the floor warm. The concrete box became a family room, a bedroom, a bathroom, a hallway. The only evidence that it was ever a basement is the lack of windows, and the lighting plan accounts for that. The concrete is still there, behind the insulation, behind the framing, behind the drywall. It is the structure. It is no longer the surface. The basement is finished. It is no longer a basement. It is a room.