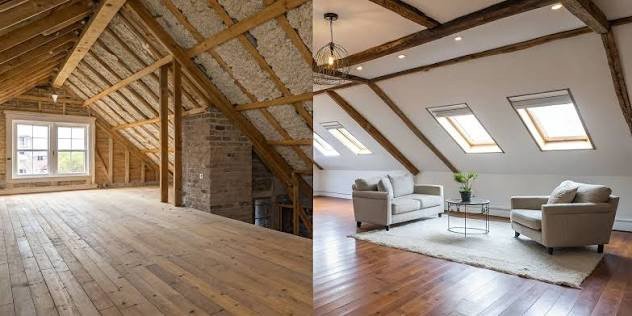
The attic is the last frontier of unfinished space in the house. The floor joists are exposed. The rafters slope down to knee walls. A single bare lightbulb hangs from the ridge. The space is hot in summer, cold in winter, and has been storing Christmas decorations and forgotten luggage since you moved in. Finishing the attic converts this storage into living space without adding a foundation, without adding exterior walls, and without altering the footprint of the house. The structure is already there. It needs floors that support weight, walls that hold heat, air that is conditioned, and light that makes the sloped ceilings feel like architecture.
According to wikiHow’s attic insulation guide, co-authored by home improvement specialist Kevin Schlosser with over 20 years of experience, the most critical step in finishing an attic is creating a tight building envelope with proper insulation and air sealing before any finished surfaces are installed. This guide covers the full process from structural assessment to painted trim.
Phase 1: Structural Assessment and Floor Reinforcement
The attic floor is the ceiling of the room below. The joists were sized to hold drywall, not furniture and people. A structural engineer or qualified contractor must evaluate the existing joists before any finishing material goes into the attic. The engineer’s report costs $300 to $500. It tells you whether the joists can support the intended use. If reinforcement is needed, the solution is sistering larger dimensional lumber alongside the existing joists, or adding a beam at mid-span supported by posts that carry the load down to the foundation.
Floor reinforcement costs $3,000 to $6,000 for a typical 500-square-foot attic. It must be completed before insulation, framing, or drywall. A floor that bounces when walked on is annoying. A floor that deflects enough to crack the drywall ceiling below is a structural failure that requires removing the finished attic floor to access the joists. The engineer’s report is the cheapest insurance in the project.
Phase 2: Staircase Compliance
Building code requires a finished attic to have a permanent staircase with minimum headroom of 6 feet 8 inches, minimum width of 36 inches, and a handrail on at least one side. A pull-down ladder or spiral staircase that serves as the primary access does not meet code for habitable space. If the existing stairs do not meet code, the staircase renovation becomes part of the attic project. This costs $4,000 to $10,000 depending on the complexity. The staircase is what makes the attic a legal room. Without a compliant staircase, the building department classifies the finished attic as storage regardless of how much was spent on drywall and flooring.
Phase 3: Insulation and Ventilation
The attic renovation moves the thermal boundary from the attic floor to the underside of the roof deck. The sloped ceiling, knee walls, and vertical end walls must be insulated. Per wikiHow’s guide, spray foam between the rafters provides the highest R-value per inch and acts as both insulation and an air barrier. The alternative is rigid foam board with sealed seams, or batt insulation with a continuous vapor barrier on the warm side. In cold climates, attics require R-38 to R-49.
Ventilation baffles must be installed between the rafters from the soffit vents to the ridge vent before insulation goes in. The baffles create a 1-inch air channel between the insulation and the roof deck. This channel allows outside air to flow from soffit to ridge, cooling the roof deck in summer and preventing ice dams in winter. Without baffles, the roof deck overheats, the shingles fail prematurely, and ice dams form at the eaves. The baffles cost $2 each. The roof replacement costs $8,000 to $15,000.
Phase 4: HVAC and Climate Control
The existing HVAC system was sized for the house without the attic. Adding 500 to 1,000 square feet of conditioned space may overload it. A ductless mini-split heat pump is the most practical solution. It provides heating and cooling without ductwork. A single outdoor unit connects to one or two indoor wall-mounted units. The system costs $2,000 to $5,000 installed. The alternative is extending existing ductwork into the attic, which consumes knee wall space and may require upgrading the main unit.
The mini-split is installed after framing and electrical rough-in, before insulation and drywall. The refrigerant lines and electrical connection run through the knee wall or sloped ceiling cavity. The indoor unit mounts on a vertical wall or knee wall where airflow is not obstructed by the sloped ceiling.
Phase 5: Framing and Drywall
Knee walls are framed vertically at the point where the sloped ceiling meets the floor, typically 4 to 5 feet high. The knee wall provides a vertical surface for drywall and baseboard. The triangular cavity behind the knee wall is framed with access doors or drawer openings for storage. Interior partition walls divide the attic into rooms. The framing is standard 2×4 construction, 16 inches on center.
Drywall on the sloped ceiling requires special handling. The ceiling experiences temperature swings that standard drywall cannot tolerate. Use 5/8-inch Type X drywall on the ceiling. Hang the ceiling first, then the knee walls, then any vertical end walls. The drywall on the sloped ceiling is screwed to the rafters every 8 inches along the edges and every 12 inches in the field. The increased screw spacing prevents sagging. Tape and mud the seams with three coats. The ceiling drywall phase takes the most calendar time because the joint compound must dry between coats.
Phase 6: Electrical and Lighting
The attic requires dedicated circuits. A bedroom requires an AFCI-protected circuit per code. A home office needs multiple outlets at desk height. The electrical rough-in happens after framing and before insulation. The electrician runs wiring for outlets, switches, and light fixtures. Recessed lights in the sloped ceiling require angled housings designed for sloped surfaces. Wall sconces on the knee walls provide ambient light. A ceiling fan at the peak improves air circulation. The electrical permit is part of the building permit. The rough-in inspection must pass before insulation and drywall cover the wiring.
Phase 7: Flooring, Paint, and Trim
Flooring goes in after painting is complete. Carpet provides sound insulation between the attic and the room below. Luxury vinyl plank is a durable alternative. The subfloor must be solid and level before flooring installation. Paint the walls and ceiling the same light color to blur the transition between vertical and sloped surfaces. White, off-white, or pale gray. A dark ceiling pulls the roofline down visually. Install baseboard on the knee walls. Install door casing around any doors. The finished attic is now complete.
Frequently Asked Questions
Should I add a bathroom to the finished attic?
A bathroom adds significant value and convenience but significant cost. Running plumbing supply and drain lines up through the house costs $15,000 to $30,000 for an attic bathroom. The bathroom makes the attic a self-contained living suite. Without a bathroom, anyone using the attic bedroom must go down a flight of stairs to use the bathroom at night. The bathroom is worth the cost if the attic will be used as a primary bedroom or guest suite. It is not necessary for a home office, playroom, or media room.
Which phases can I do myself and which require a professional?
A homeowner can perform structural reinforcement, framing, insulation, drywall, painting, and flooring. Electrical and HVAC require licensed trades. The homeowner can do roughly 60 percent of the labor. The sequence matters. The licensed trades do their work during the rough-in phase between framing and insulation. The homeowner works around the licensed trades’ schedules. The project takes 4 to 6 months of weekends for DIY with hired electrical and HVAC.
The Room at the Top of the Stairs
A finished attic is the most satisfying renovation in a house because the transformation is so complete. The space goes from an unconditioned storage area with exposed framing to a finished room with climate control, lighting, and paint. The sloped ceilings that made the space difficult to use are now the defining architectural feature. The knee walls that were dead space are now storage. The attic was always part of the house. Now it is part of the living space. The total cost is $25,000 to $75,000 for a 500-square-foot attic finished by a contractor, or $10,000 to $25,000 for a homeowner doing the framing, insulation, drywall, and flooring while hiring the electrical and HVAC. Either way, the square footage was already there. Finishing it makes it count.