You have been staring at that carpet for six years. The stain by the doorway has its own ecosystem. You pulled up a corner last weekend and found the subfloor underneath is actually in decent shape. Now twenty boxes of laminate planks are stacked in the living room, and the instruction sheet inside the first box is a single diagram with arrows pointing in four directions.
Installing laminate flooring is not technically hard. What makes it hard is that you are doing it for the first time on your actual floor, not a practice floor. Every mistake is visible. Every bad cut stays. And the physical toll, hours on your knees on a concrete slab, is something no YouTube video adequately conveys. This guide covers the steps without skipping the parts that go wrong, including the one prep step that determines whether your floor still looks good two years from now.
According to Home Depot’s installation guidelines, a properly installed laminate floor can last 15 to 25 years. A poorly installed one starts showing problems within the first six months. The difference usually comes down to what happened before the first plank clicked into place.
What You Are Installing: Laminate vs. the Alternatives
Laminate flooring is a multi-layer synthetic product fused together through a lamination process. The top layer is a high-resolution photograph of wood or stone under a clear wear layer made of aluminum oxide. The core is high-density fiberboard (HDF). The bottom is a moisture-resistant backing. It is not wood. It is not vinyl. It sits between the two on price, durability, and installation difficulty.
| Flooring Type | Material Cost/sq ft | DIY Friendly | Water Resistance | Lifespan |
| Laminate | $1.50-4.00 | High (click-lock) | Moderate (spills only) | 15-25 years |
| Luxury Vinyl Plank (LVP) | $2.50-5.00 | High (click-lock) | Excellent (fully waterproof) | 15-20 years |
| Engineered Hardwood | $4.00-10.00 | Moderate | Poor | 20-40 years |
| Solid Hardwood | $6.00-15.00 | Low (nail-down) | Poor | 50+ years |
If the room is a bathroom, laundry room, or below-grade basement, stop. Laminate and water do not mix. Spills wiped up quickly are fine. A slow leak from a toilet flange you did not know about will swell the HDF core and the floor is ruined. For wet areas, use LVP. For everywhere else, laminate gives you the wood look at a third of the cost.
Everything You Need Before You Open the First Box
The trip back to the hardware store mid-project is a laminate flooring rite of passage. It still feels bad every time. Here is the complete list so you make that trip exactly once.
Tools:
- Miter saw (cross-cuts) — borrow or rent if you do not own one; a hand saw works but adds hours
- Table saw or circular saw with guide (rip cuts) — you will need to rip the last row to width
- Jigsaw (door jambs, vents, irregular cuts)
- Rubber mallet — not a metal hammer, never a metal hammer
- Tapping block — usually comes in an installation kit; a scrap plank works in a pinch
- Pull bar — the hooked steel bar for the last row against the wall; not optional
- Spacers (3/8-inch) — buy a bag of 20; do not try to make your own from scraps
- Tape measure (25-foot minimum)
- Pencil, utility knife, carpenter’s square
- Knee pads — good ones, not the $5 gardening kind
- Safety glasses and ear protection
Materials:
- Laminate planks — measure square footage, add 10% for waste (15% if the room has lots of angles)
- Underlayment — foam, cork, or combination vapor-barrier type
- Vapor barrier (6-mil polyethylene sheeting) — mandatory over concrete; optional over wood subfloors
- Moisture-resistant tape — for sealing underlayment seams
- Quarter-round or shoe molding — to cover the expansion gap at walls
- Transition strips — where laminate meets carpet, tile, or different-height flooring
The underlayment choice matters more than people realize. Standard foam underlayment ($0.15-0.30/sq ft) is fine for most rooms. Cork underlayment ($0.50-1.00/sq ft) provides better sound insulation, which matters if the room is above a living space. Combination underlayment with an attached vapor barrier saves a step over concrete. Buy whatever your laminate manufacturer recommends. If you use a different underlayment and the floor fails, the warranty is void. That sentence alone has cost people thousands.
The Prep Work That Determines Whether Your Floor Lasts
According to wikiHow’s laminate installation guide, co-authored by general contractor Mark Spelman with over 30 years of construction experience, the key to a successful laminate floor is preparation. The most common causes of installation failure are moisture and an uneven subfloor. Both are invisible until they are not.
Acclimate the Planks (48 Hours Minimum)
Stack the unopened boxes flat in the room where they will be installed. Leave them for at least 48 hours. The planks need to adjust to the room’s temperature and humidity. Skip this and the floor will expand or contract after installation, opening gaps between boards that you cannot close without pulling up half the room. There is no shortcut. The 48-hour clock starts when the boxes are in the room, not when they arrive at your house.
While you wait, you have two days to do the subfloor work. This is actually the useful part of the acclimation period. It forces you to prep properly instead of rushing straight to installation.
Check the Subfloor Like Your Floor Depends on It
Moisture kills laminate. The HDF core absorbs water and swells, and swollen laminate does not un-swell. For concrete subfloors, tape down a 2-foot square of clear plastic sheeting and leave it for 24 hours. If condensation forms under the plastic, you have a moisture problem that a simple vapor barrier will not solve. You need to address the source before any flooring goes down. For wood subfloors, the moisture content should be no higher than 12% per a moisture meter reading.
Flatness is the other non-negotiable. Lay a 6-foot straightedge or level across the floor in multiple directions. The subfloor should have no more than 3/16-inch deviation over 10 feet. Smaller dips can be filled with a self-leveling compound. High spots need grinding. A floor that looks flat to the eye usually is not. The straightedge does not lie, and neither will the click-lock joints when they flex over a hump and snap six months later.
One thing I learned the hard way: pull any staples or nails left from the old carpet pad. The underlayment will not hide them. You will feel them through the laminate as small bumps underfoot, and by the time you notice, the only fix is to pull up the floor and start over.
Undercut Door Jambs
This is the detail that separates a floor that looks DIY from one that looks installed. Door casings and jambs extend to the subfloor. Laminate needs an expansion gap. You have two choices: cut the laminate to fit around every door casing with a jigsaw, which looks like a jigsaw was involved, or undercut the casing so the laminate slides underneath. Undercutting takes 30 seconds per jamb and produces a clean, professional result.
Lay a scrap piece of laminate and underlayment against the door casing. Rest a flush-cut saw on top of the scrap and saw through the casing. The scrap sets the exact height. The laminate slides under, the gap is hidden, and no one will ever know a first-timer installed the floor.
Laying the Floor: Row by Row
The First Row Sets Everything
Start against the longest, straightest wall in the room. Place spacers every 12 to 18 inches along the wall. The gap needs to be consistent: 3/8 inch is standard. If the wall bows, which most walls do, the gap follows the wall. The baseboard or quarter-round will cover it later.
Place the first plank with the tongue facing the wall. On most laminate, you cut the tongue off the first row so the expansion gap is clean. Snap the second plank into the end of the first. Continue until you reach the opposite wall. Measure and cut the last plank to fit, leaving the expansion gap.
The rip of a laminate plank being cross-cut on a miter saw sounds like tearing cardboard mixed with a brief high-pitched whine from the wear layer. The cut edge smells like sawdust and hot glue. Open a window. The HDF dust is fine and hangs in the air longer than wood dust.
Stagger the Joints (and Do Not Make the Staircase Pattern)
Start the second row with the off-cut from the first row, provided it is at least 12 inches long. If the off-cut is shorter than 12 inches, cut a new plank to a random length between 12 and 24 inches. The goal is to offset end joints by a minimum of 12 inches from row to row. End joints that line up or come close to lining up create a weak point that flexes underfoot.
Avoid the staircase pattern, also called H-pattern, where every other row starts at exactly the same point. It is visually jarring and structurally weak. Randomize the starting lengths. After the first three rows, the pattern should look unplanned.
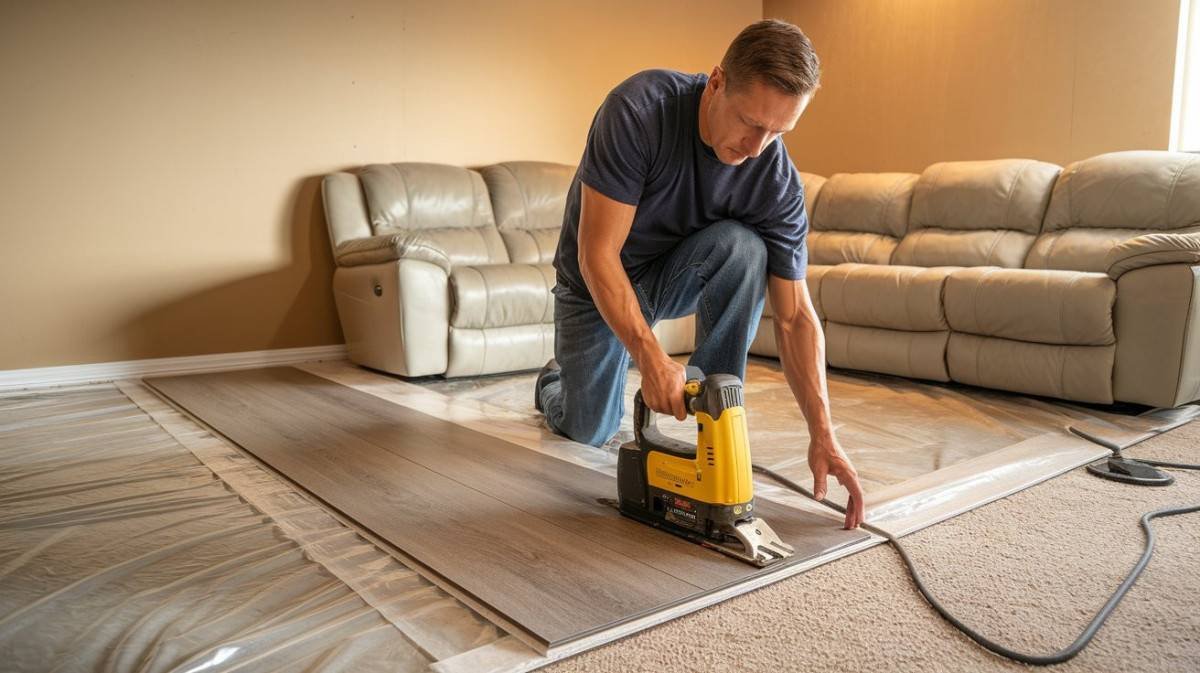
Click-Lock Technique: Angle, Lower, Tap
Modern laminate uses an angle-and-fold system. Hold the plank at roughly a 30-degree angle to the installed row. Insert the tongue into the groove along the long edge. Lower the plank flat. It should click or snap into place. Tap the end joint gently with a tapping block and mallet to close any remaining gap on the short side.
If a plank refuses to click, do not force it with the mallet. Lift it, check that nothing is in the groove (a speck of debris, a splinter of HDF), and try again. Forcing a misaligned plank breaks the locking mechanism. A broken lock means the joint will separate, and you now have one fewer usable plank than you planned for.
For the last row against the far wall, the pull bar earns its place in the tool list. Hook the bar over the edge of the plank and hammer the bar’s striking plate. The plank pulls tight against the previous row without damaging the edge. This is slow. Accept it. The last row always takes longer than the first three rows combined.
Cutting Around Vents, Pipes, and Odd Shapes
For floor vents, install the plank over the vent opening, mark the opening from underneath with a pencil, then cut with a jigsaw. Cut slightly inside the line so the vent cover’s lip hides the edge. For pipes coming through the floor, drill a hole 3/4 inch larger than the pipe diameter to allow for expansion. Cut from the nearest edge of the plank to the hole at a 45-degree angle. Glue the cutout piece back in place behind the pipe. A pipe collar or escutcheon covers the gap.
What Installing Laminate Flooring Actually Costs
| Item | DIY Cost | Pro Cost (Installed) |
| Laminate planks (200 sq ft) | $300-800 | $300-800 |
| Underlayment | $30-200 | Included in labor |
| Vapor barrier (if concrete) | $15-30 | Included |
| Quarter-round molding | $40-80 | $80-150 |
| Transition strips | $20-40 | $40-60 |
| Labor | $0 (your weekend) | $600-1,200 ($3-6/sq ft) |
| Tool rental (if needed) | $40-80/day | N/A |
| Total (200 sq ft room) | $445-1,250 | $1,060-2,210 |
DIY saves roughly $600 to $1,200 in labor. The trade is your weekend, your knees, and the risk that a mistake costs more to fix than the labor would have cost to begin with. For a straightforward rectangular room with a flat subfloor, the bet pays off. For a room with five doorways, two floor vents, a curved wall, and a 1/2-inch slope across the width, hire someone. You will know which category your room falls into after the subfloor inspection.
When to Skip the DIY and Hire a Professional
Some floors are not first-timer material. Call a pro if:
- The subfloor has more than 3/16-inch variation over 10 feet and you do not know how to use self-leveling compound.
- Moisture testing shows a problem you cannot trace to a fixable source.
- The room has a staircase, multiple angled walls, or more than three doorways. Complexity compounds fast.
- You are installing laminate in a kitchen with a dishwasher, refrigerator water line, or sink. A future leak under the laminate means pulling up the entire floor. For kitchens, LVP is the safer choice.
- You have a bad back or bad knees. This is not a joke. Eight hours on a concrete slab does permanent damage to knees that are already iffy.
Professional installation runs $3 to $6 per square foot for labor. A 200-square-foot room costs $600 to $1,200. The installer brings a miter saw, a table saw, a jigsaw, knee pads that actually work, and the knowledge of what to do when the wall is not square. That last part is the one you are paying for.
After the Last Plank Clicks In
Remove all spacers. Walk the entire floor and listen for hollow spots or clicking sounds. A hollow sound means the subfloor has a low spot the underlayment did not bridge. A clicking sound at a joint means the lock did not fully engage. Fix these now. After the baseboards go on, access becomes ten times harder.
Install quarter-round molding or shoe molding around the entire perimeter. Nail the molding to the baseboard, not to the floor. Nailing into the floor pins the laminate down and defeats the expansion gap. The floor needs to float. The molding covers the gap while allowing the floor to move underneath it.
Install transition strips at doorways. The type depends on what the laminate is meeting: T-molding for same-height floors, reducer for slightly lower floors, end cap for carpet or exterior doors.
Keeping It Looking New
Laminate is tougher than hardwood in some ways and more fragile in others. The aluminum oxide wear layer resists scratches from pets and furniture feet, but standing water is the enemy. Clean with a damp mop, never a wet one. No steam mops. The heat and moisture delaminate the layers.
Felt pads under furniture legs are mandatory. A chair dragged across laminate leaves a scratch that cannot be sanded out because laminate has no real wood to sand down to. The scratch is permanent, and replacement means pulling up planks from the nearest wall to reach the damaged one.
Frequently Asked Questions
Do I need underlayment if my laminate planks have attached padding?
If the laminate has pre-attached underlayment on the bottom of each plank, you generally do not need additional underlayment. However, you may still need a separate vapor barrier over a concrete subfloor regardless of attached padding. Check the manufacturer’s installation instructions. If they require a vapor barrier and you skip it, the warranty is void even if the plank itself has padding.
Can I install laminate over existing tile or vinyl flooring?
Yes, laminate can be installed over existing hard-surface flooring as long as the surface is flat, dry, and structurally sound. Tile floors with deep grout lines need the grout lines filled with a leveling compound so the texture does not telegraph through the laminate. Sheet vinyl installed before 1980 may contain asbestos. Do not sand or disturb it. If the vinyl is well-adhered and flat, install over it. If it is peeling or loose, remove it first.
Which direction should I lay the laminate planks?
Run the planks parallel to the longest wall in the room. This makes the room look larger and minimizes the number of cuts. If the room transitions into a hallway, run the planks parallel to the hallway for visual continuity. For rooms with a primary natural light source, running planks perpendicular to the window reduces the visibility of end-joint gaps.
What if my floor has a slight slope?
A gradual slope is acceptable for laminate as long as the floor is flat, meaning the surface does not have dips or humps. The spacers and floating installation accommodate a slope. What laminate cannot handle is a sudden change in plane, where one area rises or drops relative to the adjacent area. If the slope is severe enough that furniture visibly leans, address the subfloor before installing any flooring.
Can I install laminate on stairs?
Yes, but stair installation is not a beginner project. Each stair tread requires a separate piece of laminate, typically glued and nailed. The stair nose, the front edge of each tread, needs a special overlapping stair-nose molding that matches the laminate. Stairs get heavy foot traffic concentrated on a small area, and a poorly installed tread is a safety hazard. If you have never installed flooring before, do the main floor yourself and hire a professional for the stairs.
What happens if water gets under laminate flooring?
The HDF core absorbs water and swells. Swollen planks develop raised edges at the joints and cannot be repaired, only replaced. If a large amount of water gets under the floor, such as from a dishwasher leak or a toilet overflow, the entire floor usually needs to come up. The underlayment also absorbs water and must be replaced. This is why laminate is the wrong choice for bathrooms, laundry rooms, and kitchens with water lines. Once water gets underneath, the repair often costs more than the original installation.
Keep the Off-Cut
Save at least one full plank and a few off-cuts from the installation. Store them flat in a closet, not leaning against a wall in the garage where they will warp. Five years from now, when a heavy object chips a plank and the exact color has been discontinued, the spare plank in the closet is the difference between a five-minute fix and replacing the entire floor.