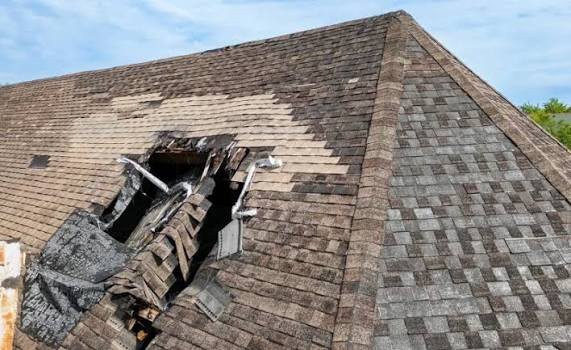
This guide covers emergency roof repair after storm damage — the five steps from containing water to filing the claim. The first thing to do after a storm damages your roof is to tarp the damaged area — before the next rain, before the adjuster arrives, before the contractor can schedule a permanent repair. A heavy-duty tarp — 6 mil or thicker, not the blue lightweight kind — costs $20 to $50 at a hardware store. The tarp must extend at least 3 feet past the damaged area on all sides. The tarp must be secured with 2x4s screwed through the tarp into the roof deck, not with bricks, not with loose boards, not with anything that the wind can lift. A tarp that is not secured correctly will blow off in the next storm. The tarp that blew off was worse than no tarp — it gave the homeowner confidence that the roof was protected. The roof was not protected. The next rain entered through the same hole. The water damage doubled. The tarp that is properly secured prevents further water entry. The tarp is the emergency repair. The tarp buys time. The time is the weeks between the storm and the permanent repair. Here is the complete sequence of what to do, in order, from the moment the storm passes.
Step 1: Safety — Do Not Go Onto a Storm-Damaged Roof
A roof that has been struck by hail, wind, or falling debris may have structural damage that is not visible from below. The decking may be cracked. The rafters may be split. The roof surface may be slippery with wet debris, loose granules, or moss. Do not walk on a storm-damaged roof unless you are a trained roofing professional with fall protection equipment. The emergency repair, tarping, can be performed from a ladder at the gutter line. The tarp is pulled over the damaged area from the ladder, not from standing on the roof. The ladder is the safe platform. The roof is the unsafe platform. The emergency is the water entering the house. The emergency is not the roof surface. The roof surface can wait for the professional. The water cannot. Tarp the roof from the ladder. Leave the walking to the roofer.
Step 2: Contain the Water Inside the House
While the tarp is being prepared, contain the water that is already inside. Place buckets under active drips. Move furniture, electronics, and valuables away from the leaking area. If the ceiling is bulging, water is pooling between the drywall and the paint, puncture the bulge with a screwdriver or a nail to release the water in a controlled location into a bucket. The bulge that is not punctured will eventually burst, dropping gallons of dirty water onto the floor, the furniture, and anyone standing underneath. The puncture is the controlled release. The puncture is a small hole that can be patched during the ceiling repair. The puncture saves the ceiling from collapsing. The bulge is the warning. The puncture is the response. Respond to the bulge.
Turn off the electricity to the affected room at the circuit breaker if water is dripping near light fixtures, ceiling fans, or electrical outlets. Water and electricity are incompatible in a way that is instantly fatal. The circuit breaker is the switch. The switch turns off the power. The power must be off before anyone touches anything near the water. The water is conductive. The power is live. The breaker is the disconnect. Disconnect the power. The power off is the safety. The power on is the risk. The risk is not worth the light in the room. The light can be replaced. The person cannot.
Step 3: Tarp the Damaged Area Properly
The tarp is the emergency roof repair. It is temporary. It is effective. It is the only emergency repair that a homeowner should attempt. The tarp must be at least 6 mil thick, heavy-duty construction tarp, not lightweight plastic sheeting. The tarp must extend at least 3 feet past the damaged area on all sides, the extra margin prevents wind-driven rain from entering at the edges. The tarp is positioned from a ladder, not from standing on the roof. One end of the tarp is attached to a 2×4, a board that is at least 8 feet long. The 2×4 is rolled into the end of the tarp several times, creating a weighted anchor. The 2×4 with the rolled tarp is lifted over the ridge of the roof, the peak, so that the weight of the 2×4 holds the tarp on the opposite side of the roof. The tarp drapes over the ridge and down over the damaged area. The bottom edge of the tarp on the damaged side is attached to another 2×4, rolled several times, and secured with screws driven through the 2×4 and the tarp into the fascia board or the roof deck. The screws, 2-inch or longer deck screws, not nails, hold the tarp against wind uplift. The tarp is pulled taut. The tarp is now secured. The tarp will stay in place until the permanent repair is made.
Do not use nails. Do not use bricks. Do not use loose boards. Nails pull out under wind uplift. Bricks blow off and become projectiles. Loose boards become projectiles. The 2x4s screwed into the roof deck are the only secure method. The 2x4s cost $10 each. The screws cost $5. The tarp costs $30. The emergency repair costs $55 in materials. The emergency repair prevents thousands in additional water damage. The emergency repair is the cheapest insurance in roofing. The insurance costs $55. The additional water damage costs $3,000 to $8,000. The insurance is cheaper.
The National Roofing Contractors Association (NRCA) recommends that homeowners document all storm damage with photographs before making emergency repairs. The photographs are the evidence for the insurance claim. The emergency repair, tarping, does not alter the underlying damage. The tarp sits on top of the shingles. The shingles underneath are unchanged. The adjuster can lift the tarp to inspect the damage. The tarp is removable. The tarp is not permanent. The tarp preserves the evidence for the adjuster. The evidence is the damaged shingles. The shingles are under the tarp. The tarp is protection, not concealment.
Step 4: Document the Damage for Insurance
Photograph everything before you cover anything. The damaged shingles. The dented gutters. The broken window screens. The debris on the ground. The hailstone next to a coin if hail was involved. The photographs are taken from the ground, from a ladder at the gutter line, and through windows. The photographs are time-stamped. The photographs are the evidence. The evidence is the claim. The claim is the insurance payout. The payout is the permanent repair. The photographs are the first link in the chain. The chain is: photograph, claim, adjuster, approval, contractor, repair. The photographs start the chain. The chain cannot start without the photographs. Take the photographs before tarping. The photographs are the priority.
Step 5: Call a Contractor and File the Insurance Claim
Call a roofing contractor as soon as the tarp is in place and the photographs are taken. Do not wait for the insurance adjuster. The contractor will perform a professional inspection, identify the full extent of the storm damage, including damage that is not visible from the ground, and provide a written estimate. The estimate is the documentation the adjuster will compare against their own findings. The contractor should be present during the adjuster’s inspection. The contractor points out damage. The adjuster evaluates it. The collaboration produces a more accurate assessment. The assessment determines the claim payout. The payout determines the scope of the permanent repair.
File the insurance claim within 24 hours of the storm. The prompt filing links the damage to the storm. The link is the evidence. The longer the delay, the harder it is to prove the storm caused the damage. Insurance policies require prompt notification. The prompt notification is the contract requirement. The requirement is enforced. The enforcement is the denial of a late claim. File the claim promptly. The promptness is the compliance. The compliance is the claim. The claim is the payout.
Frequently Asked Questions
What should I do immediately after a storm damages my roof?
First, contain the water inside, buckets under drips, puncture ceiling bulges. Second, photograph the damage from the ground. Third, tarp the damaged area with a heavy-duty tarp secured with 2x4s. Fourth, call a roofing contractor for an inspection and estimate. Fifth, file an insurance claim within 24 hours. The order matters. The tarp is the emergency repair. The photographs are the evidence. The contractor is the professional. The insurance is the funding.
Can I tarp a damaged roof myself safely, or do I need a professional?
You can tarp a roof from a ladder if the damaged area is accessible from the gutter line and you are comfortable working at ladder height. The tarp is pulled over the ridge from the ladder, not from standing on the roof. If the damaged area is not accessible from a ladder, steep roof, multiple stories, complex roofline, call a professional. The professional emergency tarping costs $300 to $800 and is covered by insurance if the claim is approved.
How long can a tarp stay on a roof before permanent repair?
A properly secured heavy-duty tarp can remain on a roof for 30 to 90 days. Beyond 90 days, UV exposure degrades the tarp and wind may loosen the attachment points. The tarp is a temporary repair. The permanent repair should be scheduled as soon as the insurance claim is processed and the contractor is available. The tarp buys time. The time is weeks, not months. The permanent repair is the goal. The tarp is the bridge. Cross the bridge as quickly as possible.
Will insurance cover the cost of emergency roof tarping?
Yes, most homeowners insurance policies cover the reasonable cost of emergency repairs to prevent further damage, including tarping. Save the receipts for the tarp, the 2x4s, and the screws. If a professional performs the emergency tarping, save the invoice. The costs are reimbursed as part of the claim. The reimbursement is additional to the permanent repair payout. The emergency repair is a covered expense. The coverage is the reimbursement. The reimbursement requires receipts. Keep the receipts.
What if another storm hits before the permanent repair is done?
Inspect the tarp after every additional storm. If the tarp is intact and secure, it is still providing protection. If the tarp has shifted, reposition and re-secure it. If the tarp has torn, replace it. The tarp is the temporary defense. The defense must be maintained. The maintenance is a visual inspection from the ground after every rain. The inspection costs nothing. The shifted tarp costs water damage. The inspection prevents the water damage. The inspection is the maintenance. The maintenance is free.
Can I do a permanent roof repair myself after the storm, or should I wait for a contractor?
Wait for the contractor if insurance is involved. The insurance company must see the damage as the storm left it before any permanent repairs are made. A DIY permanent repair, replacing shingles, resealing a vent boot, alters the evidence. The adjuster cannot evaluate the damage if the damage has been repaired. The adjuster evaluates what is visible. If the visible damage has been repaired, the adjuster sees no damage. The claim is denied or reduced. The denial is the result of the premature repair. The premature repair was well-intended. The premature repair cost the claim. Wait for the adjuster before making any permanent repairs. The emergency tarp is allowed. The permanent repair must wait.
The Tarp That Saves the Ceiling
Contain the water inside. Photograph the damage from the ground. Tarp the roof from a ladder with a heavy-duty tarp secured with 2x4s and deck screws. Call a contractor. File the insurance claim within 24 hours. Do not make permanent repairs until the adjuster has completed the inspection. The sequence is: contain, document, tarp, contractor, claim, adjuster, permanent repair. The sequence works in that order. Reversing the order costs the claim. The claim is the funding for the permanent repair. The permanent repair is the goal. The goal is a roof that no longer leaks. The tarp is the bridge to the goal. The bridge is secure. The bridge is temporary. The bridge is the $55 emergency repair that saves the ceiling. The ceiling is above your bed. The bed is where you sleep. The sleep is the return on the $55 investment. The investment is the tarp. The return is a dry bedroom. The dry bedroom is worth the tarp. Ever woken up at 3 a.m. to the sound of water dripping onto the bedroom carpet, looked up, and seen a bulge in the ceiling the size of a dinner plate — a bulge that was not there when you went to bed? The bulge was water. The water was from the hole in the roof that the storm put there six hours earlier. The hole could have been tarped. The tarp was in the garage. The tarp was not on the roof because the storm ended at 8 p.m. and you decided to deal with it in the morning. The ceiling bulge did not wait for morning. The ceiling bulge formed at 2 a.m. The ceiling bulge burst at 3 a.m. The tarp would have prevented the bulge. The tarp cost $30. The ceiling repair cost $800. The carpet replacement cost $1,200. The 3 a.m. wake-up was free. The $2,000 in damage was the cost of waiting until morning. The tarp would have been on the roof by 9 p.m. The ceiling would be dry. The carpet would be dry. The $30 tarp would have saved $2,000. The tarp is the first thing to do. The tarp is not the morning project. The tarp is the moment-the-storm-stops project. The moment is when the damage stops accumulating. The accumulation begins at the moment the storm ends and the water continues to enter. The tarp stops the accumulation. The tarp is the emergency. The tarp is the priority. The tarp is the $30 that saves the ceiling.