You replaced the flapper three months ago, and the toilet is running again. The water level is correct, the flapper is sealing, and the food coloring test shows no leak into the bowl. The problem is not the flapper. Water is flowing into the overflow tube even though the float has risen. The fill valve is not shutting off. It needs to be replaced.
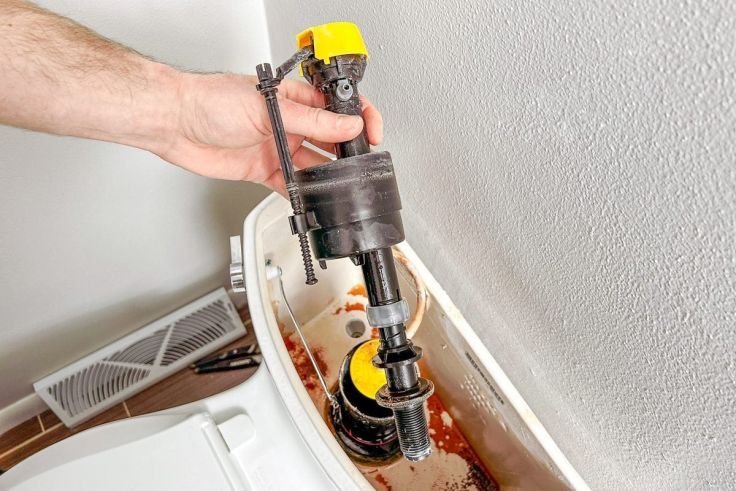
A toilet fill valve is the mechanism on the left side of the tank that refills the tank after a flush. It controls the water level and shuts off when the tank is full. Fill valves fail after five to ten years because the internal seals degrade, the float mechanism sticks, or mineral deposits prevent the valve from closing completely. Replacing a fill valve costs fifteen to twenty-five dollars and takes thirty minutes. It requires no plumbing experience, and the only tool you need is an adjustable wrench.
When to Replace the Fill Valve Instead of the Flapper
If the toilet runs continuously and the water level in the tank is correct, and the food coloring test confirms the flapper is sealing, the fill valve is the problem. A fill valve that does not shut off allows water to flow into the overflow tube even when the tank is full. Adjusting the float may temporarily stop the noise, but if the fill valve is worn out, the adjustment will not hold.
If the toilet fills slowly and takes several minutes to refill after flushing, the fill valve may be clogged with sediment. Try cleaning the valve before replacing it. Turn off the water, remove the cap from the top of the fill valve, cover the opening with an upside-down cup to prevent spraying, and turn the water on briefly to flush out debris. If the fill rate improves, the valve was clogged. If it does not, replace the valve.
If the fill valve makes a loud vibrating or squealing noise when the tank is refilling, the internal diaphragm is failing. This noise is distinctive and cannot be fixed by cleaning. Replace the valve.
Choose the Right Replacement Valve
A universal fill valve fits virtually every toilet made in the last thirty years. The Fluidmaster 400A is the standard replacement and costs $10 to $15. It is adjustable for tanks from seven to fourteen inches deep. It includes a new refill tube, a new float, and a new rubber gasket for the tank connection.
If your toilet is a Kohler, Toto, or American Standard with a proprietary fill valve, you can use a universal replacement or buy the OEM part from the manufacturer. A universal valve works in most cases. The OEM valve matches the original exactly and costs $20 to $30. If you want the valve to look exactly like the original, buy the OEM part. If you want the toilet to work, buy the universal valve.
A quiet-fill valve is a worthwhile upgrade. Standard fill valves produce a rushing water sound. Quiet-fill valves use a different internal mechanism that reduces the noise. They cost $15 to $20. If your toilet is near a bedroom and the refill noise wakes people up at night, spend the extra five dollars.
Install the New Fill Valve Step by Step
Turn off the water supply to the toilet. The shutoff valve is behind the toilet near the floor. Turn it clockwise until it stops. Flush the toilet to empty the tank. Hold the handle down to drain as much water as possible. Sponge out any remaining water in the bottom of the tank.
Disconnect the water supply line from the bottom of the old fill valve. The supply line attaches to a threaded shank that extends through the bottom of the tank. Use an adjustable wrench to loosen the nut. Place a small bucket or towel under the connection to catch the water that drains from the supply line.
Remove the lock nut that holds the fill valve to the tank. The lock nut is on the underside of the tank, below the fill valve shank. It is a large plastic nut. Unscrew it by hand or with pliers. Once the nut is off, lift the old fill valve straight up and out of the tank.
Remove the old rubber gasket or washer from the tank opening. The gasket may be stuck to the tank. Scrape it off with a putty knife. The tank surface around the opening must be clean for the new gasket to seal.
Adjust the height of the new fill valve before installing it. The top of the fill valve should be above the top of the overflow tube. Universal fill valves have a twist-and-lock adjustment mechanism. Hold the base and twist the top section to lengthen or shorten. Set the height so the critical level mark on the fill valve, usually a line or the letters “CL,” is at least one inch above the top of the overflow tube. If the critical level mark is below the overflow tube, the fill valve can siphon tank water back into the supply line, which is a code violation.
Insert the new fill valve through the tank opening. The valve body should sit vertically with the float facing away from the overflow tube so the float moves freely without rubbing against the tank wall or the overflow tube. Most fill valves are designed to be positioned with the float toward the center of the tank.
Install the new lock nut on the shank underneath the tank. Hand-tighten, then turn an additional quarter to half turn with pliers. Do not overtighten. The lock nut compresses a rubber gasket against the tank. Overtightening cracks the porcelain or distorts the gasket, causing a leak.
Attach the refill tube. The refill tube is the small plastic tube that runs from the top of the fill valve to the overflow tube. Insert the end of the tube into the overflow tube. Do not push it below the waterline in the overflow tube. If the refill tube is submerged, it can siphon tank water back through the fill valve. The end of the tube should be clipped to the rim of the overflow tube, pointing down into the tube but above the water level.
Reconnect the water supply line to the bottom of the fill valve shank. Hand-tighten, then tighten a quarter turn with a wrench. Do not overtighten. The rubber washer inside the supply line connection makes the seal. Excessive force cracks the plastic shank threads.
Turn the water on slowly. Watch the fill valve as the tank fills. Check for leaks at the lock nut underneath the tank and at the supply line connection. If either connection leaks, tighten slightly. Do not overtighten.
Adjust the water level. The float on the new fill valve determines when the valve shuts off. Most universal fill valves have a screw or a clip that adjusts the float height. Turn the adjustment screw clockwise to lower the water level or counterclockwise to raise it. Set the water level so it stops about half an inch below the top of the overflow tube. The water level should be marked on the overflow tube or on the inside of the tank.
Flush the toilet and observe the fill cycle. The tank should empty, the flapper should reseat, and the fill valve should refill the tank to the set water level and shut off. The refill tube should send a small stream of water into the overflow tube to refill the bowl. If the fill valve shuts off but the toilet continues to run, the problem is the flapper, not the fill valve.
Common Mistakes to Avoid
Setting the fill valve too high is the most common mistake. If the water level rises above the overflow tube, water flows into the tube continuously, and the toilet runs exactly as it did before you replaced the fill valve. The water level must stop below the top of the overflow tube.
Submerging the refill tube in the overflow tube water creates a siphon. The refill tube must be clipped to the rim of the overflow tube with the end above the water level. A submerged tube can contaminate the water supply with tank water, which is a health hazard.
Overtightening the lock nut cracks the tank. The lock nut only needs to be snug enough to compress the gasket and prevent the valve from wobbling. If the connection leaks, the gasket is not seated properly, or the tank surface is not clean. Tightening harder will not fix a misaligned gasket.
Forgetting to adjust the fill valve height before installing it means removing the valve and reinstalling it. Set the height before you insert the valve into the tank. Most fill valves cannot be adjusted for height once they are installed.
Troubleshooting After Installation
If the toilet does not refill after installing the new fill valve, the water supply valve is still off. Turn it on.
If the tank fills but the bowl does not, the refill tube is not connected or is not directing water into the overflow tube. The refill tube must send water into the overflow tube to refill the bowl. Check that the tube is connected to the fill valve at one end and clipped to the overflow tube at the other.
If the fill valve shuts off and then turns back on briefly every few minutes, the flapper is leaking. The fill valve is working correctly. It is responding to a dropping water level caused by a leaking flapper. Replace the flapper.
If the fill valve chatters or vibrates when the tank is nearly full, the water pressure is too high or the valve is defective. Check your water pressure with a gauge at an outdoor faucet. Pressure above 80 PSI requires a pressure-reducing valve. If pressure is normal, return the fill valve for a replacement.
If the fill valve does not shut off at all, the float is set too high or is stuck against the tank wall. Adjust the float downward. Rotate the valve body so the float moves freely without contacting the tank wall or the overflow tube. A float that rubs against the tank wall will not rise fully and will not shut off the valve.
The Short Version
Turn off the water. Flush to empty. Disconnect the supply line. Remove the lock nut. Lift out the old fill valve. Adjust the new valve height. Insert the new valve. Tighten the lock nut. Connect the supply line. Attach the refill tube above the waterline. Turn on the water. Adjust the float so the water stops half an inch below the overflow tube.
A universal fill valve costs $10 to $15. A quiet-fill valve costs $15 to $20. The tools are an adjustable wrench and a sponge. The time is thirty minutes. Stop listening to the toilet run. Replace the fill valve.