The basement is a rectangle of concrete floor and exposed joists above. The moisture test passed. The rigid foam insulation is ordered. The next step turns this empty space into rooms. Framing is the fastest and most visually satisfying phase of finishing a basement. In a single weekend, chalk lines on the floor become standing walls. The space goes from a basement to a layout of rooms you can walk through. The walls are not finished. The drywall is weeks away. But the basement suddenly has a shape, and that shape is the floor plan you drew on graph paper six months ago.
Framing a basement means building the skeleton of every wall: the exterior walls that run along the concrete perimeter, and the interior partition walls that divide the space into rooms. According to wikiHow’s comprehensive basement finishing guide, which has been viewed over 500,000 times, framing is the structural phase that defines the entire layout and must be completed before electrical, plumbing, or drywall work can begin. This guide covers the complete framing process from layout to the final stud.
Materials for the Entire Basement Frame
Per wikiHow’s basement wall guide, co-authored by home improvement specialist Ryaan Tuttle with over 17 years of experience, the key to a successful framing job is using the correct materials in the correct locations. Pressure-treated lumber is required for any wood that contacts concrete.
- Bottom plates: pressure-treated 2×4 for all exterior walls and any interior wall sitting on concrete.
- Top plates: standard kiln-dried 2×4. Attached to the ceiling joists.
- Studs: standard kiln-dried 2×4, 8-foot length for standard ceiling heights. Buy 10 percent more than your calculation. Some studs will be warped, and you will reject them during installation.
- Fasteners: 16d framing nails or 3-inch construction screws. Powder-actuated fasteners or Tapcon screws for attaching bottom plates to concrete. ACQ-compatible fasteners for pressure-treated lumber.
- Fireblocking: mineral wool, fire-rated caulk, or solid wood blocking for sealing the gap between the top plate and the subfloor above.
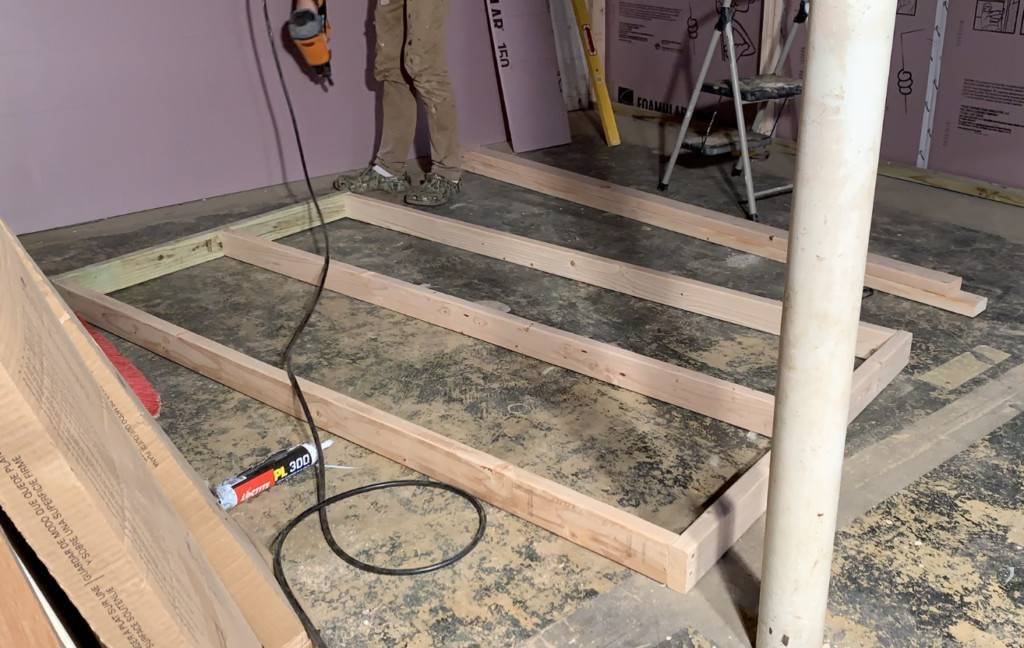
Step 1: Lay Out the Walls on the Floor
Snap chalk lines on the concrete floor for every wall in the floor plan. Exterior walls are positioned 1/2 inch to 1 inch away from the face of the rigid foam insulation on the concrete. This gap is the drainage and drying plane. Interior partition walls are positioned where the floor plan places them.
Mark the locations of all door openings on the chalk lines. A door rough opening is the door width plus 2 inches for the frame. Mark both sides of each opening. Transfer the floor layout to the ceiling by snapping chalk lines on the bottom of the joists directly above the floor lines. Use a plumb bob or a laser level to ensure the top and bottom plates align vertically. A wall that leans even slightly will produce drywall seams that crack.
Step 2: Frame the Exterior Walls First
Exterior walls are framed against the insulated concrete perimeter. The sequence is: bottom plate, top plate, studs.
Install the Bottom Plate
Cut pressure-treated 2×4 to length for each wall section. Position the plate on the chalk line. Drill pilot holes through the plate and into the concrete with a hammer drill every 24 to 36 inches. Drive Tapcon screws or powder-actuated fasteners. The plate must be rigid. If the concrete floor is uneven, slide shims under the plate at low spots until it is fully supported. An unsupported bottom plate flexes under the weight of the wall and cracks the drywall at the floor line.
Install the Top Plate
Cut the top plate to match the bottom plate. Nail it to the underside of the ceiling joists. If the joists run parallel to the wall and the top plate falls between joists, install 2×4 blocking between the joists every 16 inches to provide a nailing surface. The top plate must be level. Shim between the plate and the joists if the joists are not level.
Install the Studs
Mark stud positions on the bottom and top plates simultaneously by holding them together and marking across both with a framing square. Studs are spaced 16 inches on center. Measure the distance between the plates at each stud position individually. Cut each stud to its specific measurement. Do not cut all studs to one length. Concrete floors are never perfectly level, and a uniform-length stud will leave gaps that crack the drywall.
Toenail each stud into the bottom and top plates with two 8d nails per side, driven at a 45-degree angle. Check each stud for plumb with a 2-foot level. A stud that leans out of plumb creates a wave in the drywall that is visible under paint.
Step 3: Frame the Interior Partition Walls
Interior walls divide the basement into rooms. The framing sequence is the same as exterior walls. The bottom plate on an interior wall does not need to be pressure-treated if the concrete floor is dry. Standard kiln-dried lumber is acceptable for interior partition bottom plates in conditioned basements.
Interior walls that run parallel to the joists above require blocking between the joists for the top plate, just like exterior walls. Interior walls that run perpendicular to the joists are nailed directly into each joist they cross.
Frame all door openings as you frame each wall. A door opening in a non-load-bearing interior wall uses a flat 2×4 header laid on its face, supported by trimmer studs inside king studs. The rough opening width is the door width plus 2 inches. The rough opening height is the door height plus 1 inch for clearance. Frame the opening fully before moving to the next wall section. Retrofitting a door opening into a framed wall is more work than framing it correctly the first time.
Step 4: Frame Soffits Around Ductwork and Obstacles
The main HVAC trunk, plumbing drains, and structural beams run through the basement ceiling. These must be enclosed in soffits, which are box-shaped frames that drop below the ceiling to hide the obstacle. A soffit is a miniature wall suspended from the joists. It has a bottom plate, short vertical studs, and a face plate that the drywall attaches to.
Build the soffit in place, attaching the vertical members to the joists above and the bottom plate at the desired ceiling height. The bottom of the soffit must be level. Any variation in the soffit ceiling height is visible as a wavy drywall line where the soffit meets the wall.
Access panels are required for any plumbing cleanout or electrical junction box inside the soffit. Frame an opening with a removable panel. The access panel must be large enough to work through. A 6-inch by 9-inch panel is the minimum for a junction box. A 12-inch by 12-inch panel is the minimum for a plumbing cleanout.
Step 5: Install Fireblocking
Building code requires fireblocking at the top of every framed wall where the wall cavity connects to the floor cavity above. The gap between the top plate and the underside of the subfloor must be sealed. Fill it with mineral wool, fire-rated caulk, or solid wood blocking. This prevents fire from traveling from the basement into the floor structure above. The fireblocking is inspected as part of the framing inspection. Do not skip it.
Pre-Inspection Checklist
Before calling the building inspector for the framing inspection, verify every item on this list:
- Bottom plates are pressure-treated where they contact concrete and are anchored every 24 to 36 inches.
- Studs are spaced no more than 16 inches on center.
- All studs are plumb and all top plates are level.
- Door openings have headers with trimmer studs underneath and cripple studs above.
- Fireblocking is installed at all top plate-to-subfloor gaps.
- Access panels are framed for any concealed plumbing or electrical junctions.
- The wall layout matches the approved plans.
How Long Framing Takes
| Basement Size | Linear Feet of Wall | Solo DIY (Weekends) | Two-Person Crew (Days) |
| Small (500 sq ft, 2 rooms) | 80-120 | 1-2 weekends | 1 day |
| Medium (800 sq ft, 3-4 rooms) | 120-180 | 2-3 weekends | 1-2 days |
| Large (1,200 sq ft, 5+ rooms) | 180-250 | 3-4 weekends | 2-3 days |
Frequently Asked Questions
Do I need a separate framing permit?
Framing is covered under the general building permit for the basement finish. It does not require a separate permit. The framing is inspected during the rough-in inspection, which covers framing, electrical, and plumbing simultaneously. The inspector checks stud spacing, bottom plate anchoring, fireblocking, and door header construction.
Should I frame with steel studs instead of wood?
Steel studs are a valid choice for basements. They do not rot, do not support mold, and are dimensionally stable in humidity. They cost 20 to 30 percent more than wood and require different tools: tin snips, a chop saw with a metal-cutting blade, and fine-thread drywall screws. For basements with a history of moisture problems that have been resolved, steel eliminates the lingering concern about wood rot. For dry basements, wood is the standard DIY choice because the skills and tools are more familiar.
Should I use nails or screws for framing?
Nails are the traditional choice and are faster with a framing nailer. Screws provide a stronger connection and allow disassembly if a stud is misplaced. For a first-time framer, screws are more forgiving because a misplaced stud can be removed and reinstalled. For an experienced framer with a nail gun, nails are faster and the connection is code-compliant. Either is acceptable. Use ACQ-compatible fasteners for pressure-treated bottom plates regardless of whether you choose nails or screws.
The Bones of the Basement
Framing is the phase where the basement stops being a basement and starts being rooms. The chalk lines become bottom plates. The bottom plates sprout studs. The studs connect to top plates. The walls define the hallway, the bedroom, the bathroom, the storage closet. The space that was an empty rectangle this morning has a floor plan this evening. The framing is not the finished basement. The drywall, the paint, the flooring, and the trim are all ahead. But the framing is the bones, and everything that comes after depends on the bones being straight, plumb, and square.