The toilet is not leaking onto the floor. It is leaking between the tank and the bowl, a small stream of water that runs down the outside of the bowl when you flush, or a constant drip that leaves a puddle on the back of the bowl rim. The leak is coming from the tank-to-bowl gasket, a large rubber or foam ring that seals the joint between the bottom of the tank and the top of the bowl. The gasket compresses between the flush valve opening on the tank and the inlet opening on the bowl, and after five to ten years, the rubber hardens, deforms, or cracks, and water that is supposed to go into the bowl goes outside of it. Replacing the gasket requires removing the tank from the bowl, which is a twenty-minute job that costs about five to ten dollars for the gasket and requires no plumbing skills beyond turning a wrench and not overtightening the bolts.
The tank-to-bowl gasket is not the same as the flapper or the flush valve seal. The flapper seals the flush valve opening inside the tank. The tank-to-bowl gasket seals the flush valve opening to the bowl. A leaking flapper causes the toilet to run constantly. A leaking tank-to-bowl gasket causes water to appear on the outside of the bowl or on the floor behind the toilet. The two problems are diagnosed differently, and replacing the flapper will not fix a leaking tank-to-bowl gasket any more than replacing a car’s air filter will fix a leaking oil pan gasket.
Diagnose the Leak Before You Remove the Tank
Dry the outside of the tank and the bowl completely with a towel. Flush the toilet and watch the joint between the tank and the bowl. If water appears at the joint during the flush and continues to drip after the flush is complete, the tank-to-bowl gasket is the problem. If water appears only around the tank bolts, the bolt gaskets, the small rubber washers inside the tank under the bolt heads, are the problem. If water appears at the supply line connection, the fill valve seal is the problem. The location of the water tells you which gasket or seal has failed.
A tank-to-bowl gasket can also cause a leak that only appears when the toilet is flushed with a full tank and stops when the water level drops below the flush valve opening. The gasket is under the most pressure when the tank is full because the weight of the water pushes down on the gasket. A gasket that seals when the tank is half empty but leaks when the tank is full is a gasket that is partially failed and will fail completely soon.
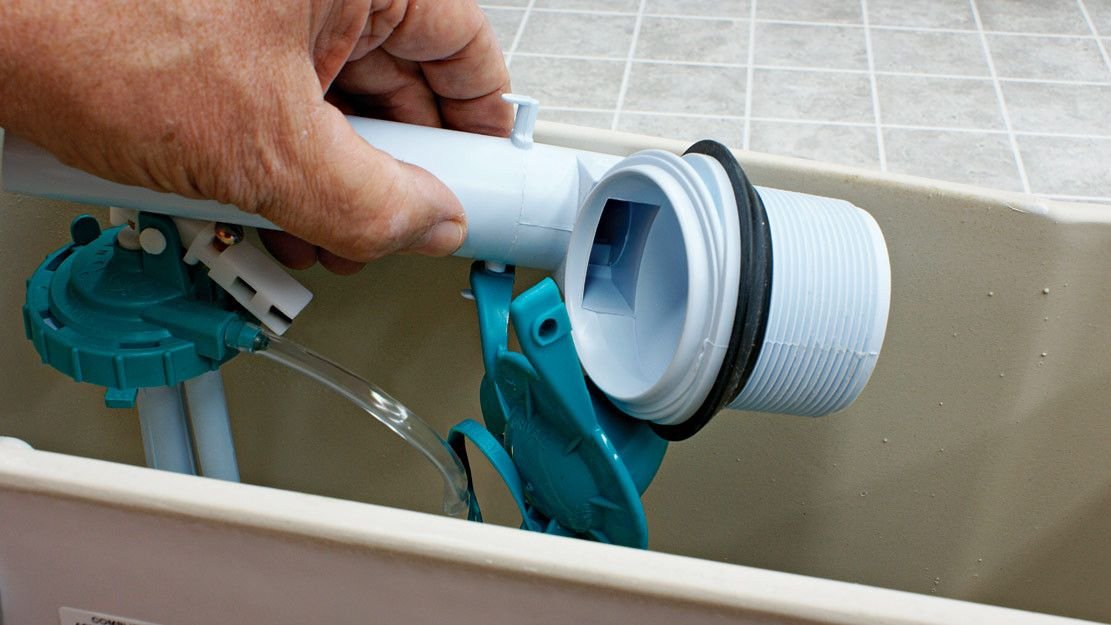
Remove the Tank — Two Bolts, One Supply Line, and the Gasket
Shut off the water supply at the valve behind the toilet. Flush the toilet to drain the tank. Sponge out the remaining water from the bottom of the tank. Disconnect the flexible supply line from the bottom of the fill valve on the left side of the tank. Use an adjustable wrench to hold the fill valve nut steady while you turn the supply line nut counterclockwise. Place a shallow pan or a towel under the connection to catch the water that will drain from the supply line.
Remove the two tank bolts that hold the tank to the bowl. The bolt heads are inside the tank, usually under small plastic caps or in recessed areas near the flapper. The nuts and washers are underneath the bowl, accessible from below. Hold the bolt head inside the tank with a screwdriver while you turn the nut underneath with an adjustable wrench. If the bolts are rusted and the nut will not turn, apply penetrating oil to the nut and the threads, wait ten minutes, and try again. If the bolt spins without loosening because the head inside the tank is not secured, grip the bolt head with locking pliers from inside the tank and turn the nut from below. A rusted bolt that cannot be removed must be cut with a hacksaw blade between the tank and the bowl.
Once both bolts are removed, lift the tank straight up off the bowl. The tank weighs about fifteen to twenty pounds empty and is awkward to grip. Set it on a towel on the floor, not directly on tile or concrete. The old tank-to-bowl gasket will be stuck to either the bottom of the tank or the top of the bowl. It is the large rubber ring, about three inches in diameter, centered on the flush valve opening. Peel it off and discard it.
Install the New Gasket — The Seal That Depends on Even Compression
Clean the mating surfaces on the bottom of the tank and the top of the bowl where the gasket sits. Remove all residue of the old gasket with a rag. Old rubber that is stuck to the porcelain will prevent the new gasket from seating flat. A gasket that does not seat flat leaks immediately.
The tank-to-bowl gasket must be the correct type for the toilet. There are three common styles. The foam gasket, a dense foam ring about half an inch thick, is the standard replacement for most modern toilets. The beveled rubber gasket, which is thicker on one side than the other, is used on toilets where the tank and the bowl do not meet perfectly parallel. The spud gasket, which fits over a threaded plastic nut on the bottom of the flush valve, is used on older toilets with a two-piece flush valve assembly. Match the new gasket to the old one by taking the old gasket to the hardware store, or by identifying the toilet brand and model and buying the manufacturer’s specified gasket. A universal gasket that claims to fit all toilets fits most and leaks on the rest.
Place the new gasket on the flush valve opening on the bottom of the tank. The gasket should sit evenly around the opening. If the gasket is directional, one side is flat and the other side has a raised lip, the flat side goes against the tank and the raised lip faces down toward the bowl. Insert the new tank bolts through the holes in the bottom of the tank from the inside. The rubber washer goes under the bolt head inside the tank, against the porcelain. The metal washer goes under the nut outside the tank. The rubber washer creates the watertight seal. The metal washer distributes the clamping force.
Lower the tank onto the bowl, aligning the bolts with the holes in the bowl and centering the gasket over the bowl’s inlet opening. The tank should sit flush on the bowl. If it rocks, the gasket is not seated properly. Tighten the nuts underneath the bowl by hand until they are snug, then tighten each nut an additional half turn with a wrench, alternating between the two nuts a quarter turn at a time. The tank should be secure and should not move when you push gently on it. It should not be wrenched down. Over-tightening the tank bolts is the number one cause of cracked toilet tanks. The gasket seals by even compression, not by brute force. A tank that leaks after half a turn past hand-tight is not leaking because the bolts are too loose. It is leaking because the gasket is pinched, misaligned, or the wrong type.
Reconnect the supply line to the fill valve, hand-tighten, then turn an additional quarter turn with the wrench while bracing the fill valve. Turn the water on slowly and let the tank fill. Check the tank-to-bowl joint and the bolt areas for leaks. A drop that appears and stops within a few seconds is normal as the gasket settles. A steady drip means another quarter turn on the nuts, evenly. A leak that will not stop after tightening means the tank must be removed and the gasket inspected for misalignment.
FAQ — Toilet Tank Gasket Replacement
How do I know if the leak is from the gasket or the tank bolts?
Dry everything and place small pieces of toilet paper around the base of each bolt and around the gasket area. Flush the toilet. The toilet paper will show exactly where the water is coming from. Water at the bolt means the rubber washer inside the tank under the bolt head has failed. Water at the gasket area means the tank-to-bowl gasket has failed. Water at both means both have failed, which is common in toilets more than ten years old. Replace the bolt washers and the gasket together. The parts cost about ten dollars total.
Can I replace the gasket without removing the tank?
No. The gasket is sandwiched between the tank and the bowl. The tank must be lifted off the bowl to access the gasket. There is no shortcut. The bolts must be removed, and if the bolts are rusted, they must be cut. Replacing the gasket without removing the tank is not possible.
I replaced the gasket and it still leaks. What went wrong?
The most common cause is the wrong gasket. A foam gasket on a toilet designed for a beveled rubber gasket will not seal. The second cause is a gasket that is pinched or folded over because the tank was lowered onto the bowl at an angle rather than straight down. The third cause is a cracked flush valve nut, the large plastic nut on the bottom of the flush valve inside the tank. If the nut is cracked, water leaks through the crack and around the gasket. The flush valve must be replaced. The fourth cause is a cracked tank or bowl at the bolt holes. A hairline crack from over-tightening will leak water that travels down the bolt and appears at the gasket area. A cracked tank or bowl means the entire toilet must be replaced.