A deck attached to the house requires a ledger board bolted to the foundation or the rim joist, and every penetration through the siding is a potential water entry point that will rot the house from the inside out if the flashing is not perfect. A free-standing deck eliminates that risk by standing on its own posts and beams, structurally independent of the house, with a gap of an inch or two between the deck and the siding. The deck does not pull on the house. The house does not support the deck. And the flashing detail that causes more deck-related water damage than any other construction error simply does not exist.
Building a free-standing deck is not harder than building an attached deck. It requires four more footings and a second beam near the house instead of a ledger board, which adds about a day of digging and concrete work and roughly two hundred to four hundred dollars in materials. In exchange, you eliminate the most common structural failure point in residential deck construction and you avoid the building code requirements for ledger attachment, flashing, and lateral load transfer that make attached decks more complicated to permit and inspect. For a deck that sits at ground level or a few feet above grade, free-standing is the simpler, safer design.
Planning the Deck — Size, Height, Materials, and the Permit Office
Decide the size of the deck based on how you will use it. A dining table with six chairs needs about twelve by twelve feet. A grill and a couple of lounge chairs need about ten by ten. A deck that wraps around a corner or steps down to a patio is a more complex design that requires multiple beam levels and possibly a change in joist direction. Keep the first deck you build a simple rectangle. You can add angles and levels on the second one.
Choose the decking material. Pressure-treated southern yellow pine is the cheapest option, about two to three dollars per square foot, and requires annual sealing or staining. Cedar and redwood are naturally rot-resistant, cost about four to six dollars per square foot, and weather to a silver-gray if left untreated. Composite decking costs about eight to twelve dollars per square foot, requires no sealing or staining, does not splinter, and looks the same in year ten as it does in year one. The framing is almost always pressure-treated lumber regardless of the decking material because the framing is structural and must resist rot. Do not frame a deck with untreated lumber even if it is under a roof.
Call the building department before you buy a single board. Most jurisdictions require a permit for any deck more than thirty inches above grade or any deck larger than two hundred square feet. The permit office will tell you the required footing depth, which is typically below the frost line, the required joist and beam sizes based on the span, the required post size, and the required railing height and baluster spacing. The permit process is not an obstacle. It is a free engineering review that prevents you from building a deck that sags, wobbles, or collapses under a snow load. Bring a sketch with dimensions, and the plans examiner will mark it up with the changes needed to meet code.
Footings and Posts — The Part of the Deck You Will Never See Again and Cannot Afford to Get Wrong
A free-standing deck needs two rows of footings. One row supports the beam near the house. The other row supports the beam at the outer edge. The footings are typically concrete piers poured in cardboard tubes called Sonotubes, extending from below the frost line to a few inches above grade. In a cold climate where the frost line is forty-two inches deep, each footing hole is forty-eight inches deep with six inches of gravel at the bottom for drainage. Digging footing holes is the most physically demanding part of building a deck, and it is the reason renting a power auger for seventy-five dollars a day is the best money you will spend on the entire project.
The number of footings depends on the beam span and the joist span. A twelve-by-twelve-foot deck with joists spanning from the house-side beam to the outer beam needs a beam on each side, and each beam needs a post at each end and intermediate posts every six to eight feet depending on the beam size. For a twelve-foot-wide deck, a beam supported by posts at zero, six, and twelve feet is typical. That is three posts per beam, six posts total, six footings. Mark the footing locations with stakes and string, measure the diagonals to confirm the layout is square, and dig.
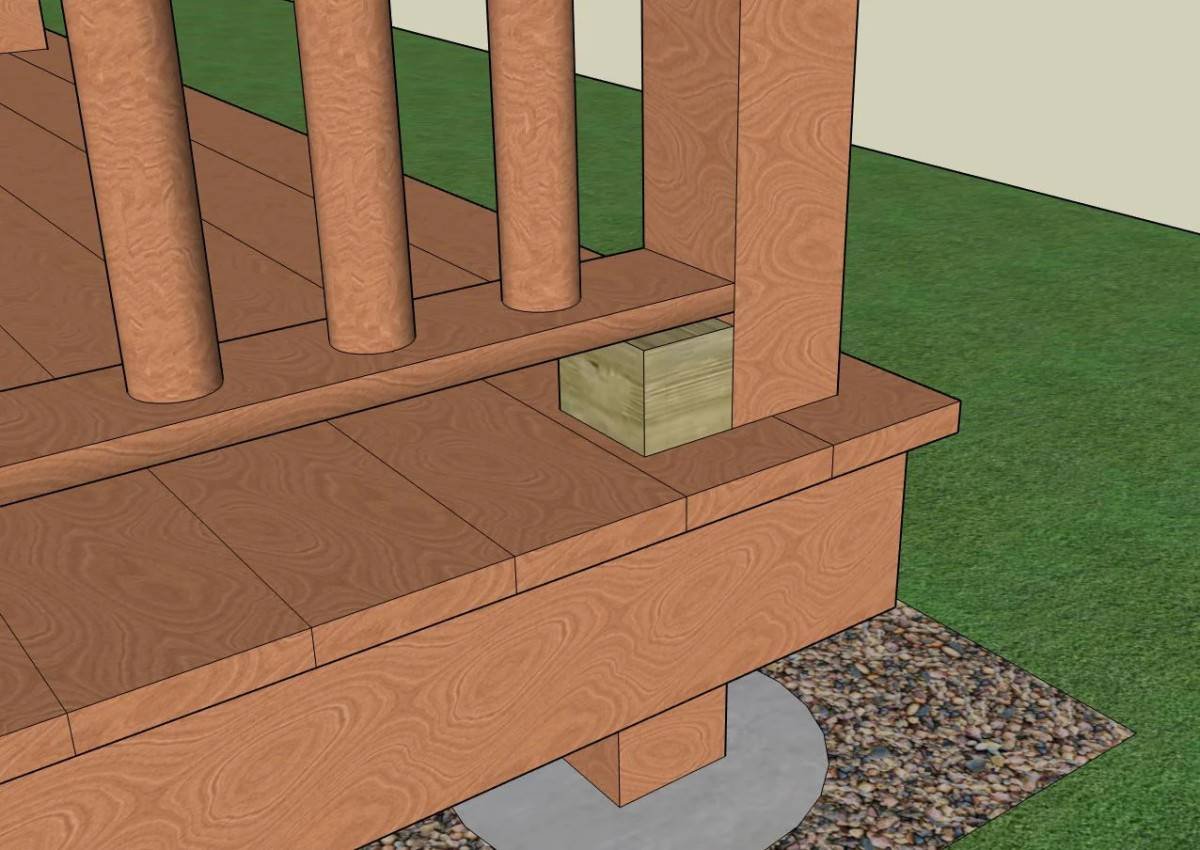
Set the post bases in the wet concrete at the top of each footing. A post base is a galvanized steel bracket that holds the bottom of the post an inch above the concrete so water cannot wick into the end grain. The post is fastened to the bracket with structural screws or bolts. Do not set the posts directly into the concrete. Even pressure-treated wood rated for ground contact will eventually rot when buried in wet concrete, and replacing a rotted post that is embedded in a footing requires demolishing the footing and starting over. A post base costs twelve dollars and replaces a five-hundred-dollar footing replacement.
Framing — Beams, Joists, and the Blocking That Keeps Everything Square
The beam is a horizontal structural member that supports the joists. For a free-standing deck, the beam typically consists of two or three two-by-tens or two-by-twelves nailed or screwed together, sitting on top of the posts and secured with post-to-beam connectors. The beam runs perpendicular to the joists. In a twelve-by-twelve deck, the joists run parallel to the house, and the beams run perpendicular, one near the house and one at the outer edge. The size of the beam is determined by the span between posts and the load it carries. A two-ply two-by-ten beam spanning six feet between posts can carry a joist span of about ten to twelve feet depending on the wood species and grade.
The joists run between the two beams, resting on top of the beams and secured with joist hangers or hurricane ties. Joist spacing is typically sixteen inches on center for composite decking and sixteen or twenty-four inches on center for two-by-six wood decking, depending on the decking manufacturer’s requirements. Every joist that sits on a beam must be fastened to prevent uplift, and the ends of the joists should be flush with the outside edge of the beam or cantilevered no more than two feet beyond the beam. A joist that cantilevers too far will bounce, and a bouncy deck feels unsafe even if the framing is structurally sound.
Blocking is the step that first-timers skip and regret. Solid blocking between joists, installed in a staggered row down the center of the deck, prevents the joists from twisting as the wood dries. Twisted joists produce a wavy deck surface. Blocking also stiffens the frame and reduces bounce. Cut blocks from the same dimensional lumber as the joists, install them in a straight line, and nail or screw through the joists into the ends of the blocks. One row of blocking at mid-span is standard. Two rows, at the one-third and two-third points, is better for a deck that will support heavy loads.
Decking and Railings — The Part You Actually See
Wood decking boards should be laid with the bark side up, which means the growth rings curve downward like a frown. This orientation reduces cupping as the wood dries. Space the boards with a sixteen-penny nail or a purpose-made spacer to create a consistent gap of about an eighth to a quarter inch for drainage and airflow. Butt joints between boards should fall on a joist, and adjacent rows should stagger the butt joints so no two joints line up on the same joist. A pattern of staggered joints looks intentional. A line of butt joints all on the same joist looks like a seam in wallpaper.
Composite decking requires hidden fasteners or color-matched screws installed at precise angles. Read the manufacturer’s installation instructions for the specific spacing, fastening, and gapping requirements. Composite expands and contracts with temperature changes more than wood, and the end-to-end gap on a hot day must be larger than on a cold day. A composite deck installed tight on a ninety-degree afternoon will buckle when the temperature drops and the boards contract against the fasteners.
Railings are required by code for any deck more than thirty inches above grade. The railing must be at least thirty-six inches high for residential decks, and the balusters must be spaced no more than four inches apart so a child cannot squeeze through. Prefabricated aluminum railing systems cost more than built-in-place wood railings but install in a fraction of the time and require no painting or staining. The railing posts must be bolted through the rim joist or the joists, not screwed into the decking boards. A railing post attached only to a deck board pulls out under the weight of a person leaning on it.
FAQ — Building a Free-Standing Deck
Is a free-standing deck really better than an attached deck?
Better is the wrong word. A free-standing deck is simpler to waterproof because it eliminates the house-to-deck connection that is the primary source of water intrusion. It is often easier to permit because it does not involve structural attachment to the house. It is more expensive in materials because of the additional footings and the second beam. It also moves independently of the house, which means the gap between the deck and the siding will change with the seasons and may collect debris. For a ground-level or low deck, free-standing is the cleaner design. For a second-story deck, an attached deck with a properly flashed ledger board is the standard approach because the height makes free-standing posts impractical.
Can I build a deck without pouring concrete footings?
Not for a permanent structure. Deck blocks, precast concrete blocks that sit on the ground, are acceptable for a floating deck that is not attached to any structure and sits at ground level, but they do not resist frost heave. In a cold climate, the ground freezes, expands, and lifts the deck blocks unevenly. The deck heaves and settles with the seasons, and the framing slowly works itself out of square. Concrete footings poured below the frost line do not move. For a deck you want to last twenty years, pour the footings.
Should the beam sit on top of the posts or be bolted to the side of the posts?
On top. A beam that sits on top of the posts transfers the load directly through the posts to the footings in compression, which is the strongest possible connection. A beam bolted to the side of the posts transfers the load through the bolts in shear, which depends entirely on the bolt size, the number of bolts, and the quality of the installation. Code allows both methods, but a beam on top of posts is simpler, stronger, and easier to inspect. The only reason to bolt a beam to the side of a post is if the beam height would otherwise exceed the railing height or block a view. For a ground-level deck, put the beam on top of the posts.