The switch on the wall controls both the fan and the light, which means you cannot turn on the fan without the light, and you cannot turn on the light without the fan. In the summer you want the fan running and the light off. In the winter you want neither. The pull chains on the fan itself are the workaround, but pulling a chain in the dark to turn on a light that is controlled by a switch on the wall is a daily frustration that a new switch eliminates in about twenty minutes of electrical work. The switch replacement is straightforward if the wiring in the wall supports separate fan and light control, and impossible without running new wire if it does not.
Installing a ceiling fan light switch means replacing the existing single wall switch with a switch that controls the fan and the light independently. The options are a stacked dual switch that fits in a single gang box, two separate switches that require expanding the box to a double gang, or a remote control receiver installed in the fan canopy that communicates with a wall-mounted remote. The right option depends on what wires are in the switch box and what wires run to the ceiling. The existing wiring determines what is possible. The switch determines how it is controlled.
Turn Off the Power and Verify It Is Off — Every Time, No Exceptions
Go to the electrical panel and turn off the breaker that controls the switch. If you do not know which breaker controls the switch, turn on the fan or the light, flip breakers one at a time until the fan or light turns off, and label the breaker. Do not trust the label that is already on the panel. Labels are wrong more often than they are right. After the breaker is off, remove the switch cover plate and test every wire in the box with a non-contact voltage tester. Touch the tester to the wire insulation, not the bare copper. The tester beeps or lights up if voltage is present. If the tester is silent on every wire, the power is off. If the tester beeps on any wire, the wrong breaker is off. Go back to the panel.
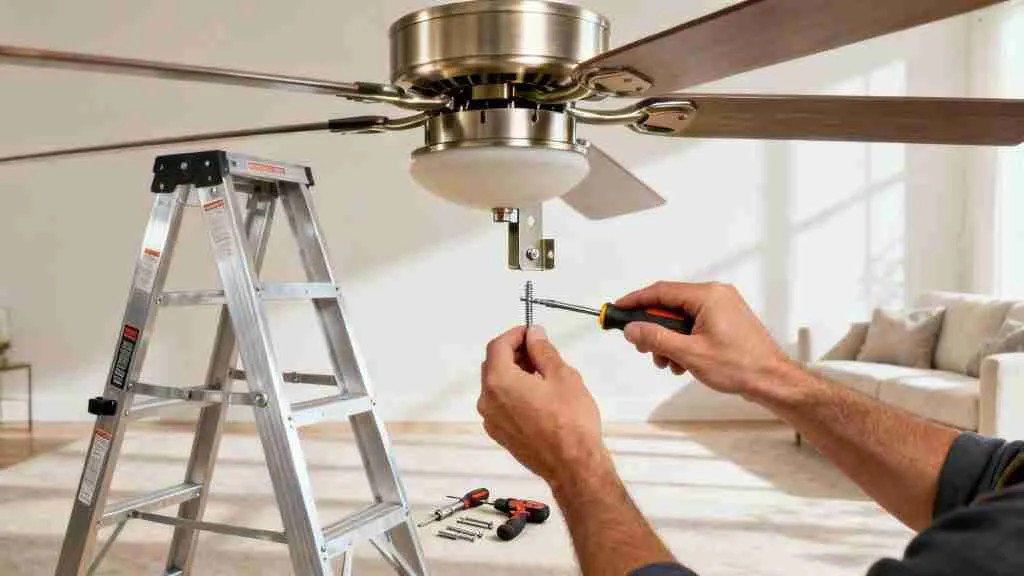
Unscrew the switch from the electrical box and pull it out gently. The wires connected to the switch are under tension from being folded into the box, and pulling too hard can disconnect a wire from a wire nut deep in the box. Pull the switch out far enough to see the screw terminals and the wires connected to them. Take a photo with your phone before disconnecting anything. The photo is your reference if the new switch does not match the old one and you need to revert.
Identify the Wires in the Switch Box
A standard single-pole switch has two screw terminals and possibly a green ground screw. One wire brings power from the panel to the switch. This is the line wire, and it is typically black and connected to the bottom screw terminal. The other wire carries power from the switch to the fan. This is the load wire, and it is typically black and connected to the top screw terminal. The switch is a gate. When the switch is on, the gate is open and power flows from the line to the load. When the switch is off, the gate is closed. A single switch controlling both the fan and the light means there is only one load wire running from the switch to the ceiling. That single wire carries power for both the fan motor and the light, and you cannot separate them at the switch without a second load wire.
Look inside the box for additional wires. If the box contains two separate cables entering from the back, each with a black wire, a white wire, and a bare copper ground, the wiring was installed to support separate fan and light switches. One cable brings power from the panel and feeds through to other outlets or switches. The other cable runs to the ceiling. In this configuration, the cable running to the ceiling has two separate hot conductors, typically a black wire and a red wire, which control the fan and the light independently at the ceiling. If you see a red wire in the box, you have the wiring for separate control.
If the box contains only one cable with a single black wire connected to the switch and white wires wire-nutted together, you have a switch loop or a simple single-pole configuration with no separate fan and light control wiring. Running a separate switch leg for the fan requires installing new wire from the switch box to the ceiling, which is a job that involves cutting holes in drywall and fishing wire through walls and ceilings. That is an electrician’s job.
Install the New Switch — Three Options for Three Wiring Scenarios
If the box has a red and a black wire going to the ceiling, install a stacked dual switch. A stacked switch is two switches in a single unit that fits in a standard single gang box. The line wire, the black wire that brings power from the panel, connects to the common terminal on the switch, which is typically a black screw or a terminal labeled common. The black load wire going to the ceiling connects to one of the switched terminals. The red load wire connects to the other switched terminal. One switch controls the fan. The other switch controls the light. Label which is which. The ground wire connects to the green ground screw on the switch and to the bare copper grounds in the box.
If the box has only one load wire and you cannot run new wire, install a wireless remote control system. A receiver module installs inside the fan canopy at the ceiling, connecting to the fan’s wiring. A wall-mounted remote replaces the existing switch, or a handheld remote is used in addition to the wall switch. The receiver separates the power into fan and light circuits controlled by the remote. Installation requires removing the fan canopy, connecting the receiver between the house wiring and the fan wiring according to the manufacturer’s diagram, and mounting the remote wall control in place of the old switch. The existing wall wiring stays as it is. The receiver does the switching. A wireless remote system costs between thirty and sixty dollars and solves the separate control problem without running new wire.
If you are willing to expand the box, install two separate switches in a double gang box. This requires removing the single gang box from the wall, which is a drywall repair project in addition to an electrical project. Cut the drywall around the existing box, remove the box, install an old-work double gang box, and connect the wires to two standard single-pole switches. The line wire connects to both switches by means of a pigtail. The black load wire connects to one switch. The red load wire connects to the other. This configuration provides full-size switches with room for a dimmer or a fan speed control, which will not fit in a stacked switch format.
Finish the Installation and Test
Connect the ground wires together with a wire nut or a ground clip, and attach a pigtail to the green ground screw on the switch. Push the wires gently into the box, folding them in a zigzag pattern so they compress rather than bunch. Screw the switch to the box. The switch should sit flush against the wall. Install the cover plate. Turn the breaker back on and test both switches. The fan should respond to one switch. The light should respond to the other. If they are reversed, swap the load wires on the switch terminals.
If you installed a wireless remote receiver, pair the remote with the receiver according to the manufacturer’s instructions, which typically involves pressing a button on the receiver and a button on the remote within a few seconds of restoring power. Test the fan speeds and the light dimming function if the remote includes a dimmer.
FAQ — Ceiling Fan Light Switch
Can I use a standard light dimmer switch for the fan?
No. A light dimmer controls the voltage to a light bulb by chopping the alternating current waveform. A fan motor is not a light bulb. A dimmer connected to a fan motor will cause the motor to hum, overheat, and eventually fail. Use a fan speed control switch designed for ceiling fan motors. Fan speed controls typically have three or four discrete speeds rather than a continuous dimming range. A universal remote control system includes both fan speed control and light dimming circuits that are safe for their respective loads.
My switch box only has two wires plus a ground. Can I install separate fan and light controls?
Not without running new wire. The two wires are the line and the load. The single load wire carries power for both the fan and the light. Separating them requires a second load wire from the switch to the ceiling. The wireless remote receiver option is the solution for this wiring configuration. The receiver installs at the ceiling and separates the power without requiring new wiring in the wall.
There are no white neutral wires connected to the old switch. Do I need a neutral for the new switch?
Standard mechanical switches do not require a neutral connection because they simply break the hot wire. Smart switches, dimmers, and electronic fan speed controls do require a neutral to power their internal electronics. If the white wires in the box are wire-nutted together and pushed to the back, you have a neutral available. Add a pigtail from that bundle to the neutral terminal on the new switch. If the box contains no neutral wires at all, which is rare but possible in very old houses where the switch is part of a switch loop, you cannot install a device that requires a neutral without running new wire. The wireless remote receiver option is also the solution here, because the wall-mounted remote is battery-powered and requires no neutral.