The shower has been dripping for two weeks. You turn the handle as hard as you can, and the drip slows but never stops. A shower that drips ten times per minute wastes over 500 gallons of water per year, reports Best Orlando Property Management. The repair costs between five and thirty dollars in parts, and it takes under an hour. The most important step happens before you touch a single tool: identifying the brand of your faucet so you buy the right replacement cartridge.
Shower faucets are more standardized than tub faucets. The vast majority of single-handle shower faucets installed in the last thirty years use a replaceable cartridge made by one of three manufacturers: Moen, Delta, or Kohler. Each brand has a proprietary cartridge that is not interchangeable. Once you know the brand, the repair is straightforward. If you guess the brand wrong, the cartridge will not fit, and you will make a second trip to the hardware store.
Identify Your Shower Faucet Brand Before You Start
Do not disassemble the faucet before you know what brand it is. The brand determines what replacement cartridge you need, what removal tool you may need, and what the disassembly procedure looks like.
Look for a brand name on the trim plate, the handle, or the showerhead. Moen, Delta, and Kohler stamp their names on visible parts. If you see a name, you have your answer. If you do not see a name, look at the handle shape. Moen handles are typically lever-shaped with a slight curve. Delta handles are often a tapered lever or a round knob with a distinctive triangular base. Kohler handles tend to be thicker, heavier, and more sculptural than either Moen or Delta.
Remove the handle and look at the cartridge stem. Moen cartridges have a brass stem with a rectangular top and a horseshoe-shaped retaining clip. Delta cartridges have a round plastic stem with a flat side and a threaded retaining ring. Kohler cartridges have a square plastic stem and a different retaining mechanism. The cartridge itself tells you the brand, even if nothing else does. Once you have the brand, go to the hardware store and buy the correct replacement cartridge.
Moen cartridges are available in two types: the older brass cartridge (model 1225) and the newer plastic Posi-Temp cartridge (model 1222). If your Moen faucet was installed before 2000, it likely uses the brass cartridge. If it was installed after 2000, it likely uses the Posi-Temp. The two are not interchangeable. Pull the old cartridge and take it to the store to match it exactly. Moen provides free replacement cartridges under its lifetime warranty. Call Moen customer service or visit their website before buying a cartridge. You may get it for free.
Delta cartridges are available in several models depending on the faucet series. The Delta Monitor series uses one cartridge. The Delta foundational series uses another. Take the old cartridge to the store. Delta also offers free replacement cartridges under warranty.
Kohler cartridges vary by model. The Kohler Rite-Temp cartridge is the most common. Kohler provides free replacements under warranty. Call or check the website before buying.
Step-by-Step Cartridge Replacement
Turn off the water supply to the shower. Some showers have integral stops, which are screwdriver-operated shutoff valves located behind the trim plate. If your shower has integral stops, turn both the hot and cold stops clockwise with a flathead screwdriver. If your shower does not have integral stops, turn off the main water supply to the house. Open the shower faucet to drain residual water.
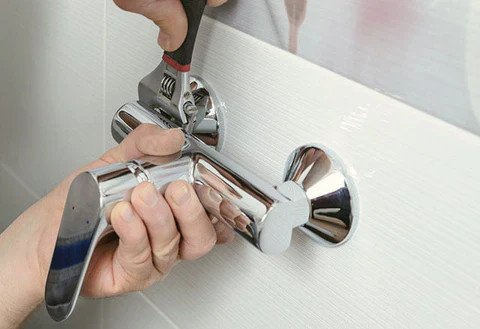
Remove the handle. Pry off the decorative cap covering the handle screw with a small flathead screwdriver. Remove the screw and pull the handle straight off. If the handle is stuck, use a handle puller. Do not pry against the shower wall with a screwdriver. You will crack the fiberglass or tile.
Remove the trim plate. The trim plate is held in place by two screws. Remove them and pull the plate forward. The cartridge is now exposed. You will see the cartridge stem protruding from the valve body, held in place by a retaining clip or a threaded ring, depending on the brand.
For a Moen faucet, use needle-nose pliers to pull the retaining clip straight up. The clip is a U-shaped brass or steel pin that slides through slots in the valve body and the cartridge. Pull it out. Grip the cartridge stem with pliers and pull straight out. If the cartridge is stuck, which Moen brass cartridges frequently are, use a Moen cartridge puller tool. The tool threads onto the cartridge stem and uses mechanical advantage to extract it. Do not twist the cartridge. Pull straight. A broken cartridge inside the valve body is extremely difficult to remove.
For a Delta faucet, unscrew the threaded retaining ring. Turn it counterclockwise. Once the ring is off, grip the cartridge stem and pull straight out. Delta cartridges typically come out more easily than Moen cartridges.
For a Kohler faucet, remove the retaining mechanism, which varies by model. Some Kohler cartridges have a clip. Others have a threaded ring. Once the retainer is removed, pull the cartridge straight out.
Inspect the valve body. Look inside the opening where the cartridge was seated. Clean out any debris, mineral deposits, or pieces of the old cartridge that broke off during removal. Use a small brush or a rag. Do not scratch the interior of the valve body. Scratches create paths for water to leak past the new cartridge seals.
Apply a thin coat of silicone plumber’s grease to the O-rings on the new cartridge. Do not use petroleum jelly. It degrades rubber over time. Slide the new cartridge into the valve body. It should seat fully with firm hand pressure. Orient the cartridge correctly. Moen cartridges have a notch that aligns with a tab in the valve body. Kohler cartridges have a flat side that aligns with a flat side in the valve body.
Reinstall the retaining clip or ring. Reinstall the trim plate and the handle. Turn the water back on slowly. Test the faucet. The handle should move smoothly through the full temperature range. The drip should be gone.
If Water Drips From the Showerhead Only When the Tub Is Running
If your shower drips only when you are running water to the tub spout, the problem is not the cartridge. It is the tub spout diverter. The diverter is the mechanism that redirects water from the tub spout up to the showerhead when you pull the knob on the tub spout. When the diverter wears out, it allows a small amount of water to leak past it and up to the showerhead even when the diverter is in the tub position.
Replace the tub spout. Most tub spouts unscrew from the pipe by turning counterclockwise. Some have a set screw underneath the spout, near the wall, that must be loosened with an Allen wrench before the spout pulls off. Take the old spout to the store for a matching replacement. The new spout costs $15 to $30. Screw it on or tighten the set screw. The showerhead should stop dripping when the tub is running.
If Replacing the Cartridge Does Not Fix the Leak
If the shower still drips after replacing the cartridge, the valve body itself may be damaged. The interior surface where the cartridge seals may be scratched, pitted, or cracked. This happens when hard water minerals build up and the old cartridge is forcibly removed, or when the valve body freezes and cracks. A damaged valve body cannot be repaired. It must be replaced, which requires cutting into the shower wall from behind or replacing the entire valve assembly from the front, which is a major plumbing job. Call a plumber.
If the leak is coming from behind the handle or the trim plate rather than from the showerhead, the O-rings on the outside of the cartridge are leaking. These are separate from the internal seals that control the drip. Some cartridges have externally accessible O-rings that can be replaced individually. Others require replacing the entire cartridge. If you replaced the cartridge and water still leaks from around the handle, check that the cartridge is fully seated and that you did not damage the O-rings during installation.
If the shower makes a loud hammering noise when you turn it off, the cartridge may be the wrong type for your plumbing system, or there may be excessive water pressure in your house. Measure your water pressure with a gauge that attaches to the outdoor faucet. Pressure above 80 PSI can cause banging and premature cartridge failure. Install a pressure-reducing valve on the main water line if pressure is too high.
The Short Version
Identify the brand before you disassemble anything. Moen, Delta, and Kohler account for most shower faucets. Turn off the water. Remove the handle and trim plate. Pull the retaining clip or unscrew the ring. Pull the old cartridge straight out. Take it to the store. Buy the exact replacement. Coat the new cartridge with plumber’s grease. Slide it in. Reassemble. Turn the water back on.
The cartridge costs $15 to $30. The manufacturer may send you one free. The tools are a screwdriver, pliers, and maybe a cartridge puller for a stuck Moen. The time is thirty minutes for a straightforward replacement and an hour if the old cartridge fights you. Stop turning the handle harder. It is not going to seal. Replace the cartridge.
Preventive Maintenance for Shower Cartridges
Cartridges typically last five to ten years. Hard water shortens that lifespan significantly.
If your water has high mineral content, you will replace cartridges more often than a homeowner with soft water. The cartridge seals accumulate mineral deposits that prevent them from closing completely. You cannot stop this from happening. You can only replace the cartridge when it does.
Once a year, exercise the shower valve through its full range of motion. Turn the handle from full cold to full hot and back several times. This distributes the lubricant inside the cartridge and prevents the seals from sticking in one position.
A cartridge that sits unused for months in a guest bathroom is more likely to leak than one used daily. If you have a shower that is rarely used, turn it on once a month, even for thirty seconds, to keep the cartridge seals from drying out and cracking.
Do not use abrasive cleaners on the shower trim plate or handle. Spray cleaners that drip behind the trim plate can penetrate the cartridge housing and degrade the O-rings. Wipe the trim plate with a damp cloth. If you use a spray cleaner, spray it on the cloth, not on the fixture.